
Every Status Effect in Dragonwilds, With the Damage Numbers
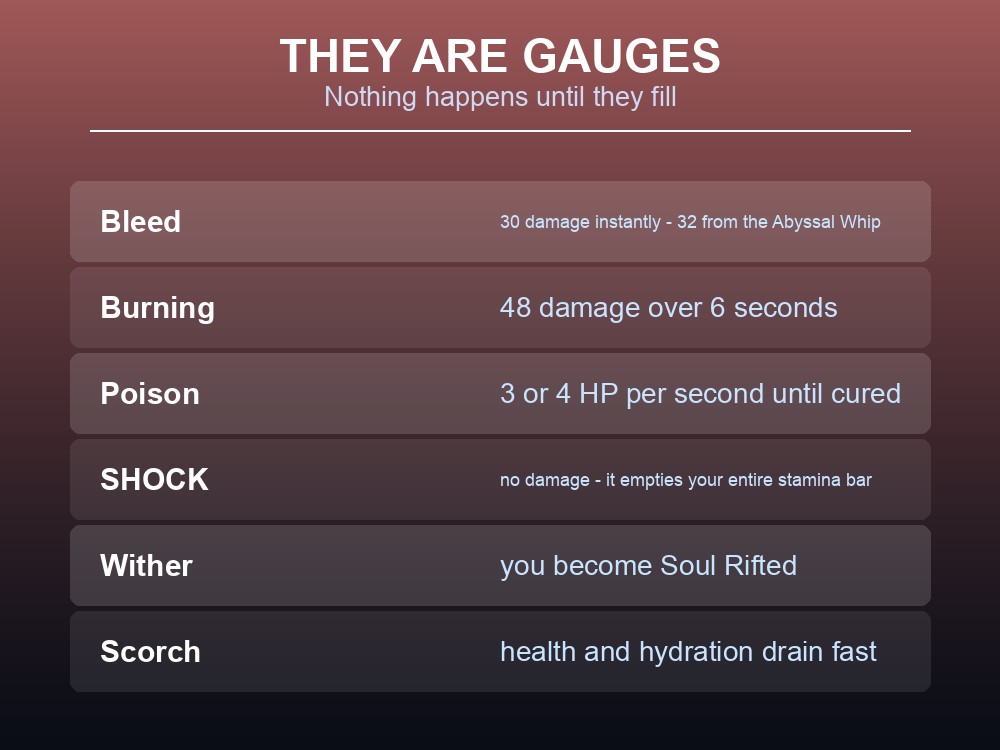
Bleed does nothing until its gauge fills, and then it deals 30 damage instantly. Burning deals 48 over six seconds. Shock deals no damage at all — it empties your entire stamina bar. Dragonwilds' status effects are gauges, not ticking timers, which means you can walk around at 90% Bleed indefinitely and take nothing, then lose a third of your health to one more hit. Knowing where each threshold sits is the difference between retreating in time and dying to a bar you never looked at.
On sourcing. Jagex do not publish status effect values. The numbers below come from the community RuneScape: Dragonwilds wiki, and can change with any patch.
The Combat Effects
| Effect | What happens when the gauge fills |
|---|---|
| Bleed | 30 damage instantly — 32 from the Abyssal Whip |
| Burning | 48 damage over 6 seconds |
| Shock | Completely drains your stamina |
| Poison | 3 or 4 HP per second, depending on the source |
| Wither | You become Soul Rifted |
| Scorch | You lose health and hydration at a fast rate |
Read the mechanic before the numbers: these are gauges that fill. Nothing happens on the way up. Everything happens at the top.
Which produces a very specific tactical rule. A half-full Bleed bar costs you nothing — but it means one more hit costs you 30. The moment to disengage is before the gauge fills, not after you start taking damage, because by then the damage has already landed.
Shock is the outlier and the most dangerous. It deals zero damage and instead empties your stamina to nothing. With no stamina you cannot attack or dodge, and blocking makes you stagger. It is a full loss of control rather than a health cost — and in a fight where you are already low, it is usually what kills you.
Poison is the only one that works as a drain rather than a burst, at 3 or 4 health per second until cured. Boss guides note Velgar's poison-based attacks will rapidly poison you and make you lose roughly 4 health per second until cured — which is why an antipoison is prep, not a luxury, for that fight.
Burning at 48 over six seconds is worth comparing to food: a Beltfish Broth restores 130. So a single full Burning gauge costs roughly a third of a good meal. Stacking them is what kills.
Wither and Scorch: The Regional Ones
Two effects belong to specific regions and behave unlike the rest.
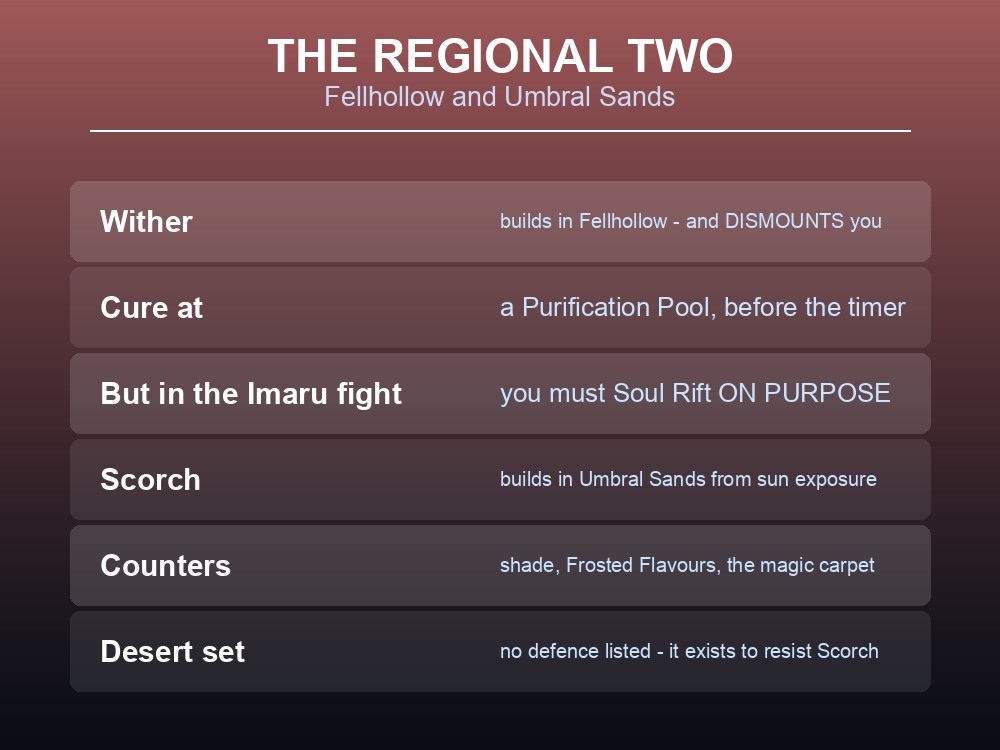
Wither builds in Fellhollow, and when its gauge fills you become Soul Rifted. It is applied by the environment as well as by enemies — Imaru's rot spikes and rot bolts both build it — and the counter is a Purification Pool, which you have to reach before a timer expires.
Wither also has a mount interaction most players discover the hard way: building Wither dismounts you. Damage and being attacked do the same, but Wither is environmental — nobody has to touch you for your terrorbird to vanish mid-crossing.
And the Imaru fight inverts it entirely. During her spectral phases she is immune to all damage, and "in order to stop her, you must enter soul rifting to do enough damage" — so the status effect you spend the rest of the region avoiding becomes the mechanic you deliberately trigger.
Scorch builds in Umbral Sands from prolonged sun exposure, and when the gauge fills you lose health and hydration at a fast rate. Its counters are practical:
| Counter | Source |
|---|---|
| Shade | The environment |
| The magic carpet | Crossing faster |
| Frosted Flavours | Cactus Water, the Cooling infusions, Monkfish Skewers, Umbral Kebab |
| Desert Hood / Robes / Legs | Resist Scorch Buildup — more pieces, more resistance |
The Desert set is the only armour in the game with no listed defence values, existing purely for this. In a region where hydration drives your stamina regeneration across an eightfold range, losing it fast is not a side effect — it is the danger.
The Debuffs That Are Not Damage
| Debuff | Trigger | Effect |
|---|---|---|
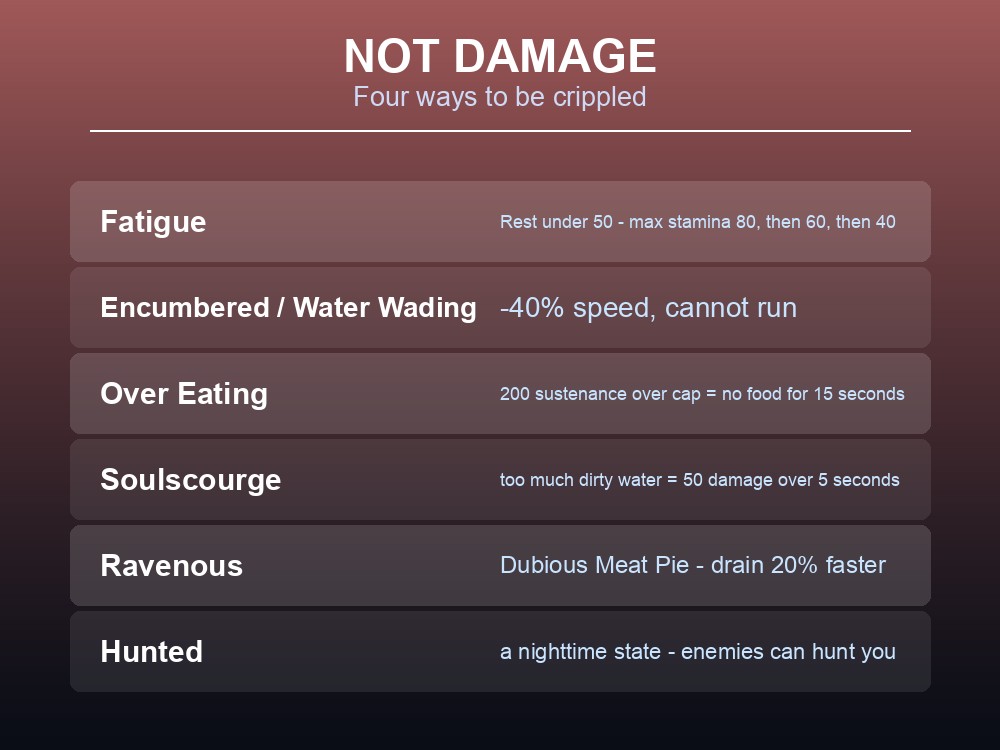
| Fatigue | Rest below 50 | Max stamina 80; 60 below 25 Rest; 40 at zero. Also −100 carry capacity and sustenance and hydration capped at 75 |
| Encumbered | Carry weight | −40% speed, cannot run |
| Water Wading | Standing in water | −40% speed, cannot run |
| Over Eating | 200 sustenance over the 100 cap | Cannot eat for 15 seconds |
| Soulscourge | Too much dirty water | 50 damage over 5 seconds |
| Ravenous | Dubious Meat Pie | Hydration and sustenance drain 20% faster |
| Hunted | Nighttime | You can be hunted by enemies |
Over Eating is the one that decides your combat food. Because eating past the cap eventually locks you out for 15 seconds, and there is a 2-second delay between meals regardless, the useful metric for a healing food is health per point of sustenance, not raw health. A Beltfish Broth at 130 health for 25 sustenance beats a Stuffed Catfish at 200 for 80 across a long fight, simply because you can eat more of them before the lockout.
Soulscourge is a trap for anyone rationing water. Dirty water fills a gauge, and when it fills you take 50 damage over five seconds. Clean it, or alternate.
And Hunted is a nighttime state, not an attack. It "allows the player to be hunted by enemies" — which pairs with the observation that higher-starred variants of some creatures only appear at night. Night is not merely darker; it is a different threat model.
Resistances and What Ignores Them
Every combat status has a food perk that slows it:
| Status | Perk | Example food |
|---|---|---|
| Poison | Fungal Fortitude | Grilled Mushrooms, Steak Sandwich |
| Shock | Grounded | Fried Onions, Steak Sandwich |
| Bleed | Coagulated | Flank Steak, Steak Sandwich, Maple Toastie |
| Scorch | Frosted Flavours | Cactus Water, Monkfish Skewers |
| Wither | Steadfast Stomach | Dubious Meat Pie |
The Steak Sandwich carries three of them at once — Fungal Fortitude, Grounded and Coagulated, for 600 seconds. It is the single best pre-fight food in the game for that reason alone.
Potions go further than resistance: Antipoison removes existing Poison stacks and grants 33% resistance; Antipoison II removes stacks and grants 66%; Antifire does the same for Burning at 33%. Removing stacks is the key difference — food slows the gauge filling, potions empty it.
Now the part that changes how you build for bosses. Status effects are the first thing bosses are immune to:
| Boss | Immune to |
|---|---|
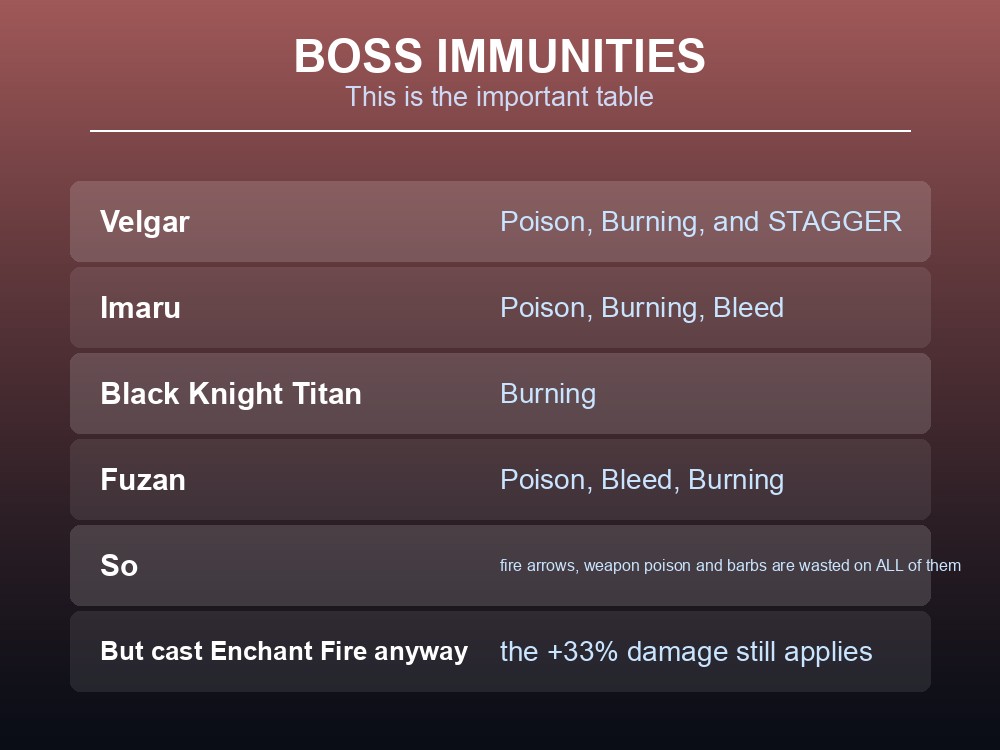
| Velgar | Poison, Burning |
| Imaru | Poison, Burning, Bleed |
| Black Knight Titan | Burning |
| Fuzan | Poison, Bleed, Burning |
Every documented boss is immune to Burning. So fire arrows, weapon poison and weapon barbs are wasted inventory on all four — and Enchant Weapon: Fire still helps, because its +33% damage applies even when the Burning does not.
Velgar is also immune to stagger, which means parries and stagger specials lose their edge there too.
Practical tips
- Status effects are gauges — nothing happens until they fill.
- Bleed: 30 damage instantly. Burning: 48 over 6 seconds. Poison: 3–4 HP/second.
- Shock deals no damage — it empties your stamina bar entirely.
- Wither fills in Fellhollow and dismounts you; cure at a Purification Pool.
- Scorch fills in Umbral Sands; counter with shade, Frosted Flavours or the Desert set.
- Over Eating locks you out of food for 15 seconds past 200 over the cap.
- The Steak Sandwich resists poison, shock and bleed at once for 600s.
- Potions remove stacks; food only slows the gauge.
- All four documented bosses are immune to Burning — leave the fire arrows home.
Running your own RuneScape: Dragonwilds server
Resistance food and antipoison are things you make before you need them, in a kitchen that has to still exist next session. A gamever Dragonwilds server keeps Ashenfall available around the clock for up to six players, updates automatically so client and server versions never drift, and takes one-click backups before disruptive changes.
Conclusion
Dragonwilds' status effects work as gauges that pay out only when full, which is why they feel like nothing until they suddenly are not. Bleed deals 30 damage instantly — 32 from the Abyssal Whip — Burning deals 48 over six seconds, Poison drains 3 to 4 health per second until cured, and Shock deals no damage at all but empties your stamina bar, leaving you unable to attack or dodge. Wither belongs to Fellhollow, ends in Soul Rifting, and dismounts you as it builds; Scorch belongs to Umbral Sands and burns through health and hydration together. Alongside them sit non-damage debuffs — Fatigue below 50 Rest, Encumbered and Water Wading at −40% speed, Soulscourge at 50 damage from too much dirty water, and Over Eating, which locks you out of food for 15 seconds and quietly makes health-per-sustenance the right way to pick a combat meal. Food perks slow these gauges — the Steak Sandwich covers poison, shock and bleed in one item — while potions remove existing stacks. And the single most useful fact for anyone gearing up: every documented boss is immune to Burning, so fire arrows, weapon poison and weapon barbs are dead weight in all four fights.
Want a kitchen stocked before the fight? Rent a Dragonwilds server at gamever.io — instant setup, one-click backups and updates, and 24/7 uptime. Start with a free trial and use promo code WELCOME.