
Screamers and the Heat Map: How Noise Spawns 7 Days to Die's Deadliest Zombie
The Screamer is a special type of zombie that appears and investigates sources of player activity, she is drawn to "heat" — the noise and activity your base gives off — rather than wandering in on sight. She's easy to identify once you know what to look for: "a Screamer can be easily identified by their signature white dress, long black hair, and high-pitched shrieks and hisses." The same page also flags the catch: "they are also shorter than average zombies, and can occasionally be difficult to spot when behind cover." She's classified as a Zombie / Hostile entity, with a base 250 HP, 8 entity damage, and 7 block damage, and the wiki dates her to Alpha 13, with her behavior last updated in Alpha 16.0. This guide covers exactly how her scream mechanic works, what each of her four variants brings to a fight, and what actually builds the "heat" that draws her to your base.
What Makes a Screamer Scream
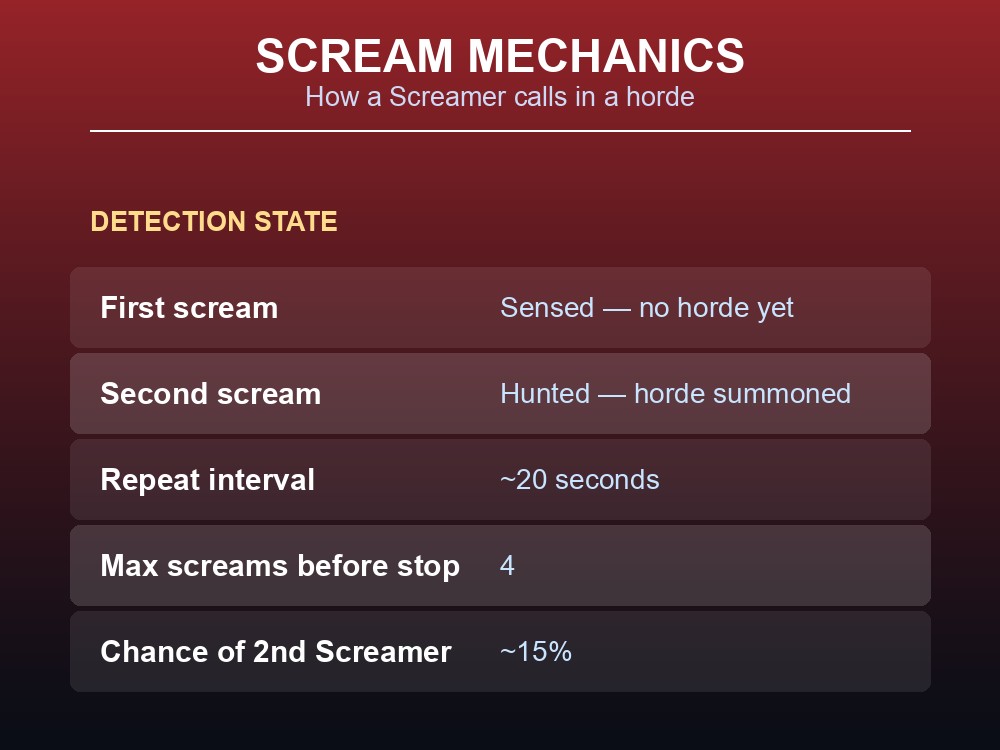
The wiki is specific about the two distinct sounds she makes: "Screamers emit two different distinct screams based on the player's concealment. The first scream will indicate the Screamer has merely sensed a player (this scream will not summon zombies) and the second louder scream indicates a player is now being 'hunted' and they will begin summoning small hordes in retaliation." Once you're in that "hunted" state, the pressure compounds: "for as long as the player remains 'Hunted' the Screamer can continuously summon hordes of zombies roughly every twenty seconds." That escalation isn't unlimited, though — "this was later limited to 4 screams before hordes will stop spawning." So the worst case per encounter is 4 waves at roughly 20 seconds apart, not an infinite horde.
There's a compounding risk on top of that: "a Screamer's scream has a chance (roughly 15% chance) to summon another Screamer." Two active Screamers means two independent 4-scream horde clocks running at once, which is exactly why the wiki recommends killing her fast: "Screamers should always be a prioritized kill above any other zombie." If you're well-equipped, there's an alternate play: "they can bait or trap a Screamer and kill the incoming hordes for XP. When they are done, simply kill the Screamer to stop zombies from spawning." Two smaller notes worth knowing: killing a Screamer without her ever spotting you carries "a low chance for a second Screamer to spawn and investigate right away," and Screamers spawned through the Entity Menu in Debug Mode "do not appear to actually summon zombies" (tested on Alpha 21.1) — a difference specific to debug-spawned entities, not how she behaves in a normal playthrough.
Screamer Variants and Their Stats
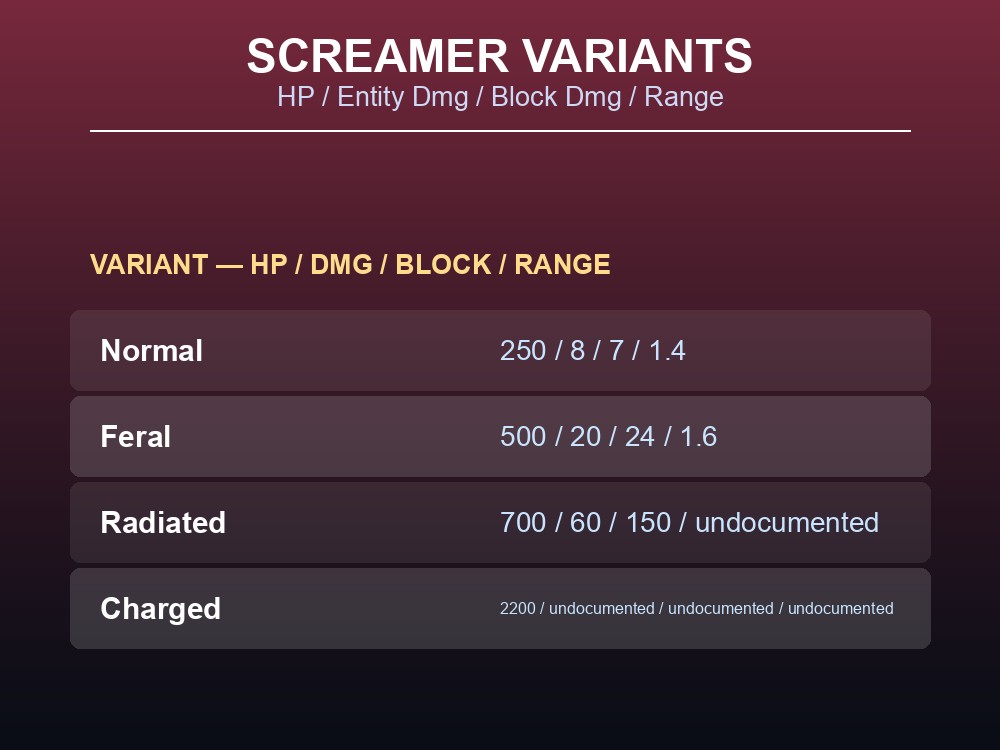
The wiki lists four variants — Normal, Feral, Radiated, and Charged — with health that climbs steeply: Normal 250 HP, Feral 500 HP, Radiated 700 HP, Charged 2200 HP. That's the full set, confirmed twice on the page (once in the infobox, once in the variants table), so the count and the numbers both check out. Entity damage and block damage are only listed for three of the four variants in the source table — Normal 8 / 7, Feral 20 / 24, Radiated 60 / 150 — with Charged's damage and block-damage figures undocumented on this page. Range is documented for even fewer: Normal 1.4, Feral 1.6, with Radiated's and Charged's range left undocumented.
In combat, the wiki notes Screamers run slower than the average zombie, but "like every other zombie, have the ability to sprint at night." Traps add a wrinkle: they "can also cause them to become crawlers, making them even smaller and harder to find." Because of the low base health, a common tactic is picking her off at range: "a recommended method is to use a firearm in an attempt to score a headshot, as they have low health and predictable movement patterns during the day." Loot-wise, the infobox lists her Loot Container as ID 38 in the game files, but the source page doesn't spell out what that container actually contains — undocumented here.
The Heat Map: What Actually Attracts a Screamer
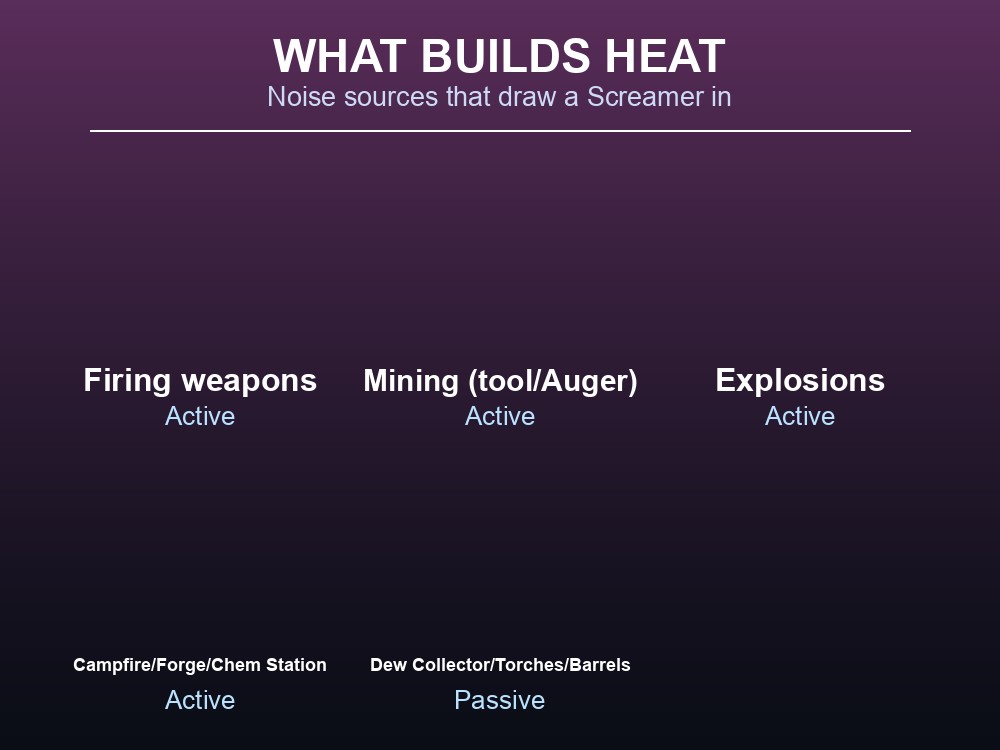
The heat map isn't thermal — it's acoustic. The Screamer "investigates sources of player activity, referred to as heat levels that is based off of sound the player creates either by explosions, firing weapons, or mining using either a tool or an Auger." She'll occasionally spawn near a high-heat area and start searching, and "like all zombies, Screamers can sense player sounds through walls," including breaking into a structure if the noise source is inside one. Active heat sources the wiki calls out by name: firing weapons, an Auger, and running a Campfire, Forge, or Chemistry Station — the page's own advice is to stop using those "immediately if a Screamer is heard close by." Passive sources add up too: "having too many passive sources of Heat, such as Dew Collectors, Torches, or Burning Barrels can also affect the Heatmap."
Time also raises the stakes of every scream. The wiki gives a three-band escalation by day: Days 1–27, summoned zombies are regular daytime spawns; Days 28–60, Screamers add special zombies to the mix — "Spider Zombies, Zombie Dogs, and Cop Zombies"; from Day 60 onward, they summon "Ferals and Radiated Zombies with a much higher probability." The wiki also notes Screamers "can spawn in pairs at certain Game Stages" — which specific stages trigger the pair-spawn isn't documented on this page — and that she naturally spawns at the Bell Lake Point of Interest.
Practical tips
- A Screamer's first scream just means she's sensed you — no horde yet. The louder second scream is the one that starts the 20-second horde clock.
- You get a hard ceiling of 4 hordes per Screamer before the screaming stops, so surviving the burst matters more than out-running it.
- Kill her the moment she spots you; every extra second at "hunted" is another chance at a full 20-second horde wave, and a ~15% chance she calls in a second Screamer.
- Cut active noise — Campfire, Forge, Chemistry Station, firearms, Auger — the second you hear one nearby, and keep passive sources (Dew Collectors, Torches, Burning Barrels) in mind too.
- After Day 60, treat every Screamer horde as a Feral/Radiated horde, not a regular-zombie one.
Running your own 7 Days to Die server
Screamers get more dangerous the more people are making noise near the same base — a full group running a Forge, Chemistry Station, and Auger simultaneously stacks heat fast, and the day-60 escalation the wiki documents means a mid-to-late-game group can eat a Feral/Radiated horde from a single unlucky scream. A gamever 7 Days to Die server keeps your group's world running around the clock so that day count (and the horde composition it drives) stays consistent for everyone, gives admins console access to manage difficulty and player settings without touching anyone's local files, and takes one-click backups before your group changes anything base-affecting. Spinning one up takes a few minutes, and new servers get a free trial with promo code WELCOME.
Conclusion
A Screamer only starts summoning hordes after her second, "hunted" scream, then repeats roughly every 20 seconds up to a hard cap of 4 waves — with a ~15% chance each scream calls in a second Screamer and doubles that clock. Her four variants scale from 250 HP (Normal) to 2200 HP (Charged), though the source only documents full damage and range figures for the two weaker variants. What draws her in the first place is noise, not temperature: firearms, mining, explosions, and running a Campfire, Forge, or Chemistry Station all add to the heat map, with passive sources like Dew Collectors, Torches, and Burning Barrels contributing too. Kill her fast, watch your active noise once you hear her nearby, and expect the fights to get meaner past Day 60.