
Project Zomboid Trapping: XP, Trap Types, and Catch-Chance Math
Trapping is one of Project Zomboid's Survivalist skills. Its tooltip is blunt: "Increases the chances of catching an animal in a trap, and allows better traps to be crafted." This guide works entirely from pzwiki.net's Trapping page — XP, the six documented trap types and catch percentages, the game's own catch-chance formula, and the zone/bait rules — flagging anywhere the source is silent rather than guessing.
Leveling Trapping: XP, Skill Books, and Starting Bonuses
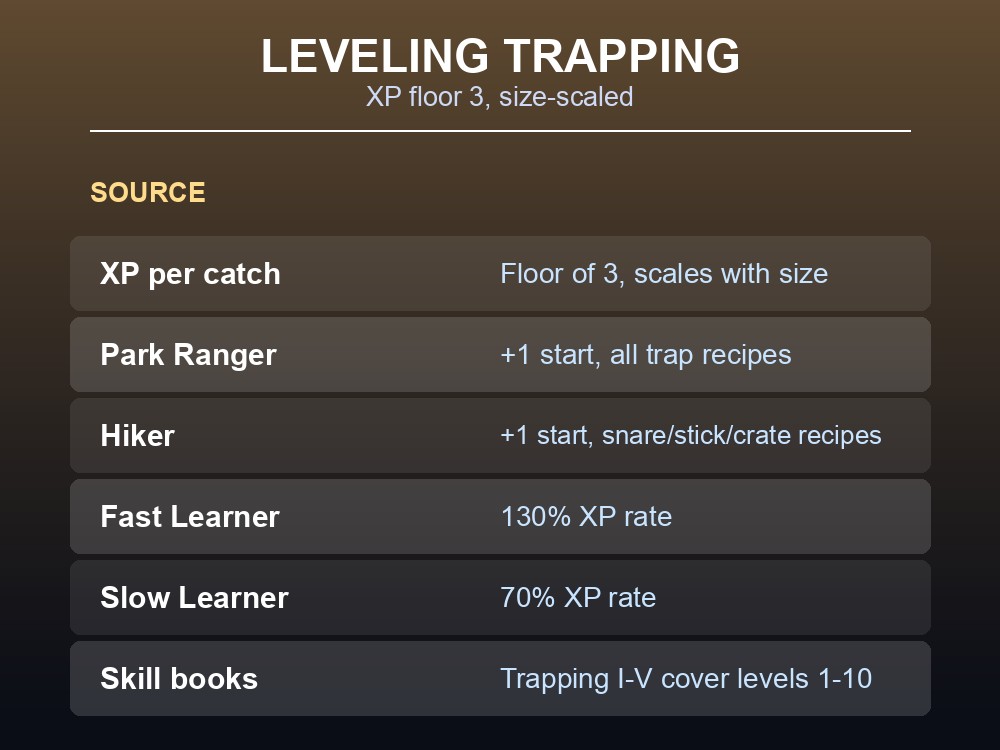
XP comes from collecting an animal from a trap you placed. Per the source, it's "proportional to the animal's size (noting that size is slightly randomized; see spoils), with a floor of 3 XP" — every catch pays at least 3 XP, undocumented beyond that floor.
Park Ranger gives +1 Trapping and "knows all the trap recipes"; Hiker gives +1 Trapping and "the snare, stick, and wooden crate trap recipes." XP rate is separate: Fast Learner raises it to 130%, Slow Learner drops it to 70%.
Five skill books cover two levels each: Trapping I "Basic Pest Control" (1–2), II "Better Trapping, with Dean" (3–4), III "Park Rangers Wildlife Handbook '93" (5–6), IV "Research on Rodents and Mammals of Kentucky" (7–8), V "The Encyclopedia of Applied Animal Psychology" (9–10). Four magazines teach recipes instead: Small Game Hunting, The Hunter, Wildlife Preserve, Get Stuffed.
Entertainment adds flat XP, capped at "the first 3 levels and any overflowing XP amount": the TV episode Exposure Survival Day 6, 6:00 PM gives +100 XP (teaches "Trap Crate"); the VHS Exposure Survival Episode 6: Trapping gives +125 XP (teaches "Wooden Box Trap").
Trap Types and Catch Chances
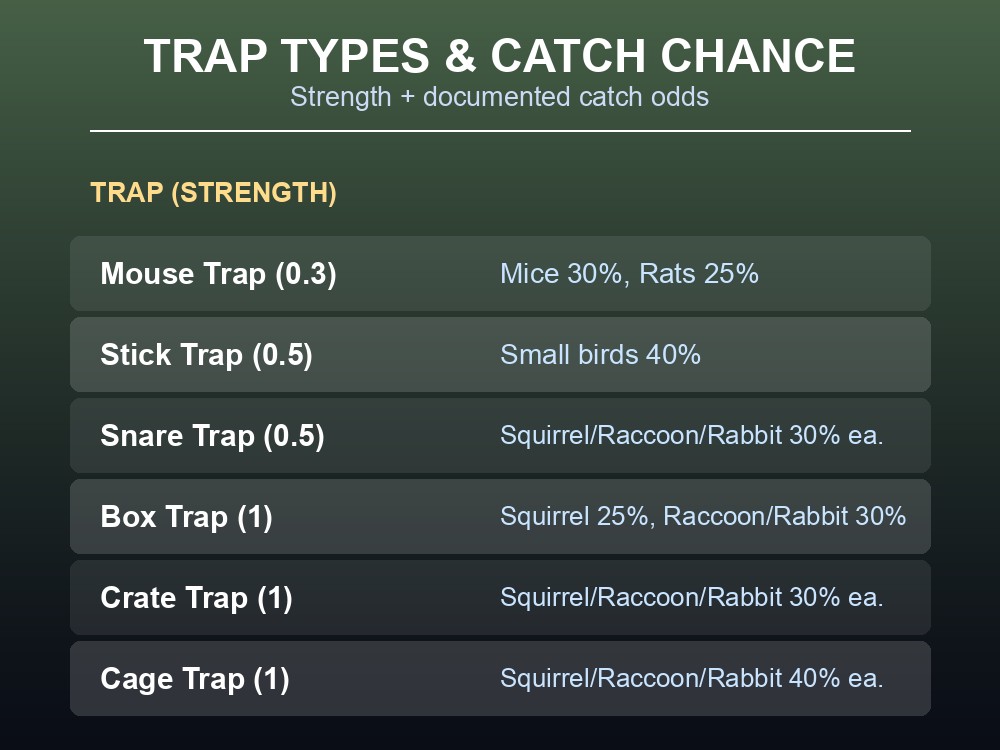
Six traps exist, each with a Strength stat and the animals its description names: Mouse Trap (0.3, uncraftable) catches mice and rats (the row lists two rates, 30% and 25%, but the source doesn't label which animal maps to which); Stick Trap (0.5, Trapping 0) catches small birds only (40%); Snare Trap (0.5, Trapping 1) catches squirrels/raccoons/rabbits at 30% each; Box Trap (1, Trapping 2 + Carpentry 1) catches squirrels, raccoons, and rabbits (its row shows 25% and 30%, unlabeled by animal — though a separate source note that Crate Traps beat Box Traps on squirrels implies the 25% is the squirrel rate); Crate Trap (1, Trapping 0) catches the same three at 30% each; Cage Trap (1, Trapping 3) catches them at 40% each — the best documented odds.
The trap table also lists a second numeric column per trap (50/15/10/15/15/20 for Mouse/Stick/Snare/Box/Crate/Cage) whose header wasn't captured in the rendered text — undocumented what stat it represents.
Crafting needs a learned recipe plus materials: a Cage Trap needs 5 units of wire and pliers, taught by Magazine: Wildlife Preserve (or auto-learned at Trapping 5). Per the source: "Trap Crates currently appear strictly better than Trap Boxes... they require fewer prerequisites and less materials and have a higher chance of catching squirrels. Trap strength does not appear to be affected by carpentry or trapping skill."
The Catch-Chance Formula and Trap Mechanics
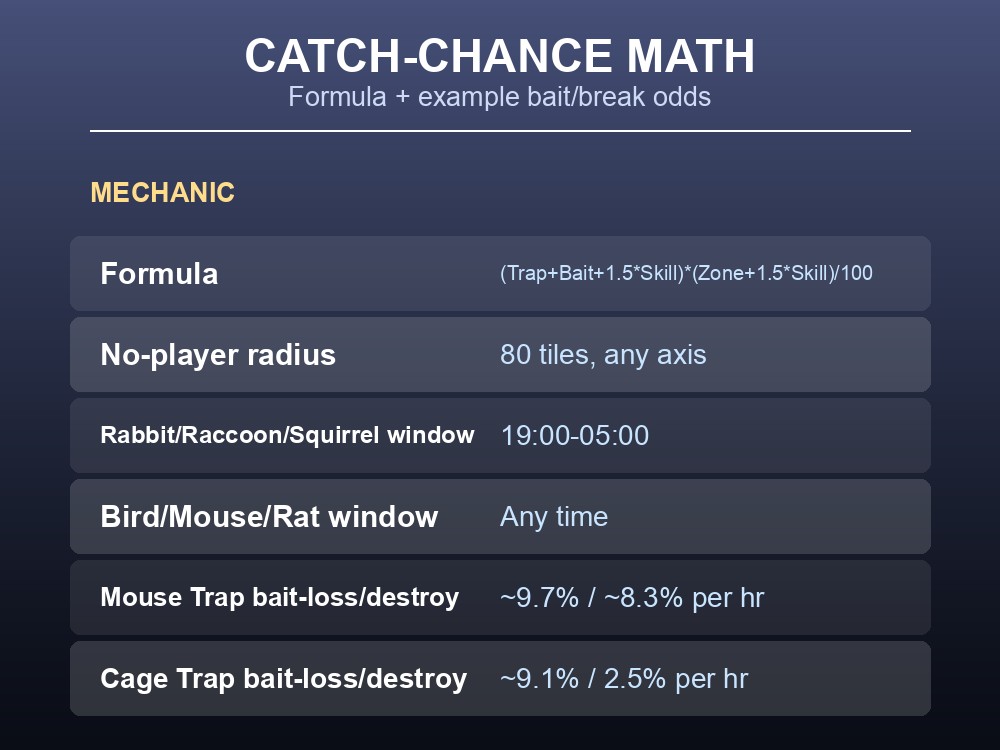
Every in-game hour a trap "ticks," checking whether an animal is caught, bait is lost, or it breaks. It checks: catchable now, catchable in this zone, baited with valid fresh bait, and no players within 80 tiles. Only then does it roll a catch, per the source's formula:
Chance = [(Trap type + Bait type + 1.5 × Skill) × (Zone + 1.5 × Skill)] / 100
Rabbits, raccoons, and squirrels are only catchable 19:00–05:00; birds, mice, and rats any time. If nothing's caught, the trap separately rolls losing bait or breaking, using only Strength: lose-bait = 1 / (strength + 10), destroy = 1 / (40 × strength). Worked: a Mouse Trap (0.3) loses bait at 1 / 10.3 ≈ 9.7% and breaks at 1 / 12 ≈ 8.3% per idle hour; a Cage Trap (1) loses bait at 1 / 11 ≈ 9.1% and breaks at 1 / 40 = 2.5% — far sturdier unattended.
The 80-tile rule is a chunk-loading mechanic: at 80 tiles on one axis a chunk is guaranteed unloaded, and traps only "catch" while unloaded — checked per axis, so per the source "a trap that is 79 tiles south and 79 tiles east could still be loaded." Traps can't be placed near walls or windows since a patched exploit, and zombies are drawn to a trap holding a catch, "similarly to their response to generators."
Zones, Bait Basics, and Setting a Trap
Zones are hard-coded, never reclassified by player action; "roads do not count as trapping zones." Per the source: mice favor Farm (60) and Trailer Park (60); rats favor Farm (50); small birds favor Farm (35) and Vegetation (30); rabbits and squirrels both favor Deep Forest (15) and Forest (12); raccoons spread widest, listed across roughly a dozen zones — most forest types weighted 12–15, plus a couple of low-weight urban ones (Trailer Park and Town at 2).
Bait, quoted where wording is the evidence: "Only fresh or stale food can be used as bait... you cannot use rotten food," and fruit/vegetables "must be fresh to be effective." Frozen items work "without needing to be thawed first." Baiting "removes -5 hunger from the chosen bait." The source states only one specific bait-animal pairing: "Insects are useful if the player uses them as bait for bird traps. Termites and pillbugs are not able to be used as trap bait at all" — its other attractiveness numbers aren't labeled to specific animals, so no other pairing is stated here.
To set a trap: place it from your main inventory in a valid zone, add bait, then — per the source — "wait over 80 tiles away for at least an hour of in-game time," and return to "Check trap." Killing the catch needs an equipped weapon, except "small animals can be killed without a weapon."
Practical tips
- Mouse Trap: catches mice and rats (rates of 30% and 25%, unlabeled by animal), found rather than built.
- Cage Trap's 40% beats every other craftable trap for squirrels/raccoons/rabbits, needing Trapping 3.
- Stay 80+ tiles away on a single axis — diagonal distance doesn't count.
- Rabbits/raccoons/squirrels only trigger 19:00–05:00; birds/mice/rats trigger any time.
- Weaker traps break/lose bait far more per idle hour: Mouse Trap breaks 3×+ as often as Cage Trap.
- Only fresh/stale food works; fruit/veg must be fresh; insects are the one confirmed bird-trap bait.
Running your own Project Zomboid server
Hourly ticks and an 80-tile no-player radius make solo testing slow — a dedicated server with friends checking separate trap lines covers more zone/bait combinations per real hour. Admin commands make it easy to adjust the clock or spawn a bait item to test a pairing before spending real food, and server settings let you tune zombie population independently of the trapping grind.
Conclusion
Trapping XP floors at 3 per catch, scaling with an animal's randomized size, with five skill books (Trapping I–V) covering levels 1–10 and Park Ranger/Hiker giving starting bonuses. Of six documented traps, Cage Trap posts the best odds at 40% for squirrels, raccoons, and rabbits, and the source calls Trap Crates strictly better than Trap Boxes. The catch-chance formula is trap + bait + 1.5×skill, times zone + 1.5×skill, over 100 — checked hourly against an 80-tile no-player radius, with weaker traps breaking and losing bait several times more often than stronger ones.
Want to run trap lines with a full group instead of soloing the 80-tile wait? Rent a Project Zomboid server at gamever.io — instant setup, automatic updates, and 24/7 uptime. Start with a free trial and use promo code WELCOME.