
Mods, Modlets and Overhauls on Your 7 Days to Die Server
7 Days to Die has one of the richest modding scenes in survival gaming, and almost all of it drops into a single place: a Mods folder on your server. But not every mod behaves the same once it's there — a small XML tweak and a total overhaul have completely different rules for anti-cheat and for whether your players need to install anything. This guide explains the categories, how the Mods folder works on your gamever server, and the two rules that decide whether a mod "just works" or locks your group out. For the click-by-click install, pair it with our install mods walkthrough.
Modlets vs. overhauls
Almost everything you'll install falls into one of two buckets:
| Type | What it is | Typical contents |
|---|---|---|
| Modlet | A small, self-contained mod — a recipe change, a new block, a quality-of-life tweak. You can stack many of them. | XML files, sometimes custom icons or asset bundles |
| Overhaul | A large mod that reworks core systems (progression, crafting, UI). Usually runs as one big package. | XML plus compiled code (.dll / Harmony) |
Both live in the same Mods folder — the difference is in how much they change and what they're built from, and that's what drives the rules below.
How the Mods folder works
On a gamever server you manage mod files through the File Manager (browser) or over FTP (Settings → FTP) for larger uploads:
- Mods live in a folder named exactly
Mods(capital M) at the root of the server files. It doesn't exist by default — create it the first time you add a mod. - Each mod gets its own subfolder inside
Mods, and that subfolder must contain the mod'sModInfo.xmlat its top level. Per the official wiki,ModInfo.xmlis required — without it the game ignores the folder entirely. - Watch the double-folder trap. Unzipping often leaves you with
Mods/CoolMod/CoolMod/ModInfo.xml— one layer too deep, and the mod won't load. TheModInfo.xmlmust sit directly inside the subfolder you drop intoMods.
Always stop the server before adding or removing mods, and back up first — see backup & restore. Watch the Console on the next start to catch any load errors.
The two rules that decide if a mod works
Rule 1 — Do your players need it too?
This is the one that locks groups out. It depends on what the mod contains:
| Mod contents | Do clients need the files? |
|---|---|
| Pure XML modlet | No. XML changes push from the server to each client automatically — players don't need to install anything on their end. |
| Custom icons / asset bundles | Yes. Asset bundles don't push from the server — each player needs the files locally. |
Compiled code (.dll) / overhauls | Yes. Every player needs the same mod, matched to the same version. |
Server-side tool (.dll) | No. Some tools (e.g. Server Tools) run alongside the dedicated server only. |
So a pure-XML modlet is genuinely server-side — upload it and your players are done. An overhaul is the opposite: every player must install the matching build at the matching version, or they can't join. Settle that with your group before you commit.
Rule 2 — EAC (Easy Anti-Cheat)
Whether anti-cheat has to come off depends on the same split:
- Pure XML modlets and asset-only modlets run with EAC on — no change needed.
- Mods with compiled code (
.dll), and full overhauls, need EAC disabled. If you're unsure, turning it off runs everything — at the cost of the anti-cheat protection it provides. - Crossplay requires EAC enabled and the
Modsfolder empty, so an EAC-off modded server is PC-only.
Turning EAC off
On a gamever server you don't edit the file by hand — there's a toggle. Open Settings → Server:
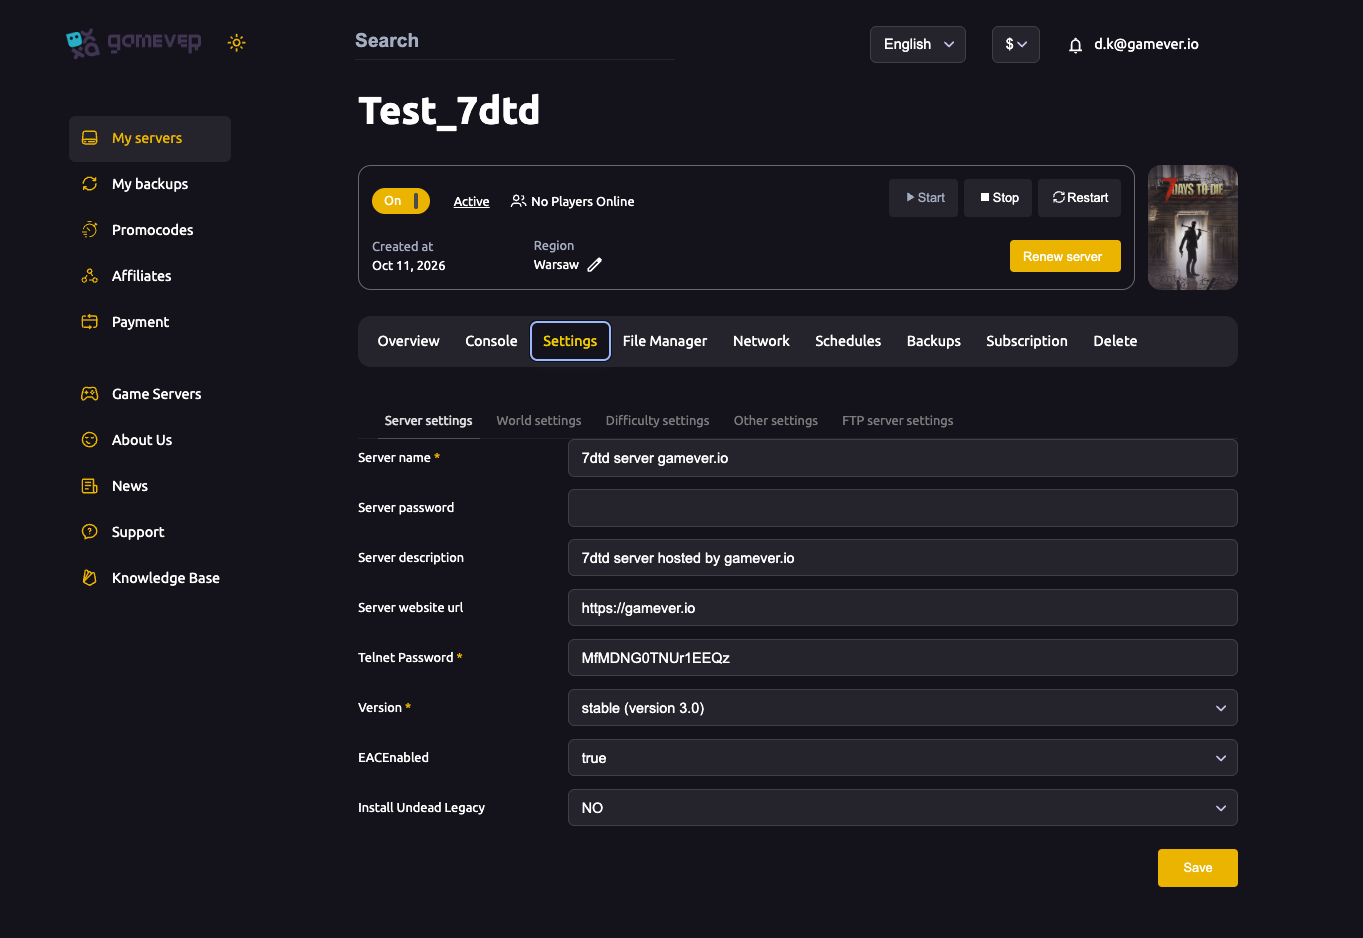
Set EACEnabled to false, click Save, then Restart from the Overview tab. (Under the hood this writes to serverconfig.xml, which advanced users can also edit via the File Manager.) Remember that each player then has to launch the game without EAC to join. Full field-by-field notes are in server settings explained.
The one-click overhaul shortcut
If you want a big overhaul without any file work, your gamever panel has a built-in option: on Settings → Server, set Install Undead Legacy to YES, Save and Restart, and the server pulls the overhaul for you. Players still install the matching Undead Legacy build locally to join. The step-by-step is in install mods.
Additional Tips
- Back up before and after any mod change — the Backups tab is one click.
- One mod per subfolder inside
Mods, each with its ownModInfo.xml, keeps things tidy and easy to remove. - Check version compatibility — a mod built for an older build can crash the server or stop it starting.
- Start small. Add one modlet at a time and restart; if the server won't load, you know which one to pull.
- Keep EAC on if you can — pure-XML modlets don't need it off, and leaving it on keeps crossplay available.
Conclusion
Modding 7 Days to Die comes down to one folder and two rules: drop each mod into its own subfolder under Mods (with its ModInfo.xml at the top), then decide EAC and client-matching by what the mod contains — pure XML is effortless and server-side, while overhauls need EAC off and the matching build on every player's machine. Or skip the files entirely and flip Install Undead Legacy to YES for a one-click overhaul.
Rent your 7 Days to Die server at gamever.io — full File Manager and FTP for custom mods, a one-click overhaul toggle, and backups a tab away. Free trial, promo code WELCOME.