
Icarus Server Ports and Firewall Explained

If you've read a generic Icarus hosting guide, you've probably seen pages of advice about opening UDP ports, forwarding them through your router, and adding firewall rules. Here's the good news: none of that applies to a server you rent from gamever. Your Icarus server runs in our Warsaw data centre, its ports are assigned automatically by the control panel, and the firewall is already configured to let players in. There is nothing to port-forward and nothing to open. This guide explains what Icarus uses ports for, where to read your own server address in the panel, and what to check if a friend can't connect.
How ports work on a gamever server
Every game server needs one or more network ports so that players' game clients can reach it. On a self-hosted machine at home, you'd have to open those ports in your router and operating-system firewall yourself — the step that trips most people up. On gamever that work is done for you: when your Icarus server is created, the panel allocates a unique set of ports on our infrastructure and opens them at the firewall. You never pick a port number, and you never touch a router.
Because the ports are managed on our side, you also can't get them "wrong". The only thing you need from the networking side is your server address, which the panel shows you on the Network tab.
What ports Icarus uses (for context)
You don't need to configure these, but it helps to understand what's happening under the hood. An Icarus dedicated server uses two UDP ports:
| Port (standard default) | Protocol | Purpose |
|---|---|---|
| 17777 | UDP | Game port — carries the actual gameplay connection between client and server |
| 27015 | UDP | Steam query port — lets the server advertise itself so it shows up in Steam's server browser |
The game port is what players connect to; the query port is what lets your server appear in the in-game Dedicated Servers browser. If the query port weren't reachable, your server could run perfectly yet stay invisible in the browser — which is exactly why people with home setups spend so long on it. On gamever, both are already open and mapped, so this is background knowledge, not a task.
Note: Icarus is a Windows-only, PC-only dedicated server with no crossplay and no RCON. Administration is done in-game via chat commands, not through a remote console port — so there's no extra admin port to worry about either.
Reading your own address on the Network tab
Open your server in the panel and click the Network tab. You'll see your assigned addresses laid out like this:
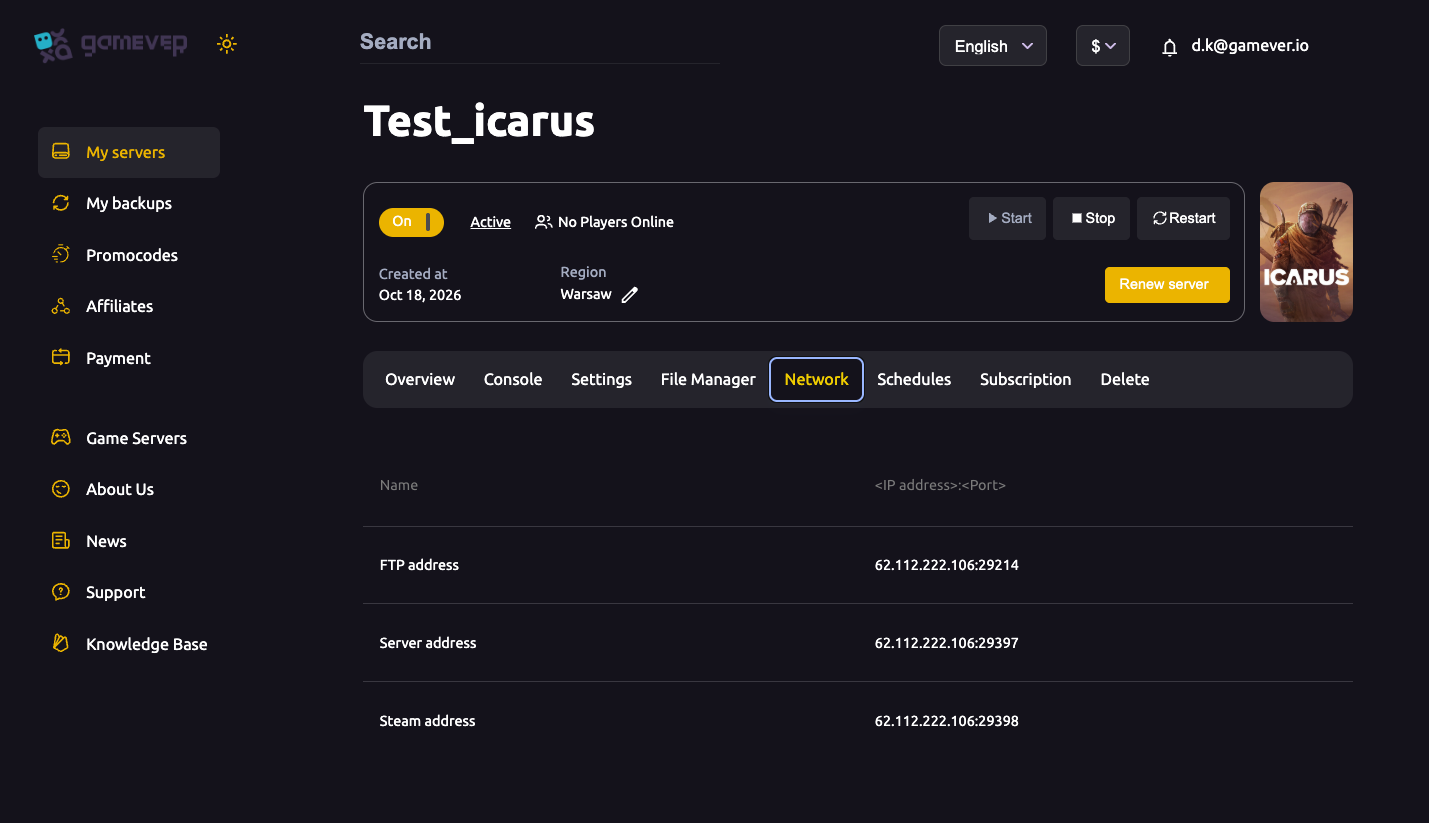
| Row | Example value | What it's for |
|---|---|---|
| Server address | IP:29397 | The address players use to join directly — this is what you share |
| Steam address | IP:29398 | Used by Steam to list and query your server |
| FTP address | IP:29214 | For connecting an FTP client to manage your files |
The values above are examples — your server will show its own IP and its own port numbers. Note that gamever's panel assigns its own port numbers (like 29397) rather than the game's raw defaults (17777); that's normal and nothing you need to change. Always copy the real values from your Network tab.
Using your address for Direct Connect
To invite friends, give them the Server address exactly as it appears on your Network tab — the IP and the port together, e.g. 203.0.113.10:29397. In Icarus they'll open the server browser, choose to join by direct address, and paste it in. If you've set a join password under Settings → Server password, share that separately. For the full step-by-step of joining, see how players connect and join.
If someone can't connect
Because the ports and firewall are handled for you, a failed connection is almost never a port problem on a gamever server. The usual culprits are simpler:
- The server isn't running. Check the Overview tab — if it's stopped, press Start and wait for it to come fully online.
- The address was copied wrong. Re-copy the Server address from the Network tab; a missing digit in the port is the most common mistake.
- A join password is set. If you've set one under Settings, the player needs it.
- Version mismatch. Everyone must be on the same Icarus build; an out-of-date client is refused.
For a full walkthrough of connection problems and their fixes, see what to do when you can't connect.
Additional Tips
- Never port-forward. If any guide tells you to open UDP 17777/27015 in a router, it's written for self-hosting — it doesn't apply to your gamever server.
- Share the Server address, not the Steam address. The Steam address is for Steam's own listing; players join on the Server address.
- Bookmark your Network tab. Your IP and ports stay put, so save the address once and reuse it.
- Set an admin password first. Icarus treats a blank admin password as "anyone can claim admin" — set one under Settings before going public.
- Restart after settings changes. After editing anything in Settings, click Save, then Restart from the Overview so it takes effect.
Conclusion
Ports and firewalls are the part of game hosting people dread most — and on a gamever Icarus server, they're the part you can safely forget about. We assign and open everything for you; your only job is to read your Server address off the Network tab and share it. Icarus uses a UDP game port and a Steam query port behind the scenes, but the panel maps both automatically, so there's no forwarding, no firewall rules, and no guesswork.
Rent your Icarus server at gamever.io — ports pre-configured, firewall handled, and a friendly panel so you can get straight to surviving the planet. Free trial, promo code WELCOME.