
How to Tame a Pteranodon in ARK
The Pteranodon is one of the easiest flying tames in ARK to get started on, but ark.wiki.gg is clear that "easy" still means a knockout (KO) tame — you immobilize or headshot it before it ever eats. This guide follows the wiki's own Pteranodon page: how the KO strategy works, which kibble and meat it prefers, what the Level 1 taming table documents for feeding time and torpidity decay, and the saddle level and base stats you're taming toward. Anywhere the source doesn't give a clean, labeled figure, this guide says so instead of guessing at one.
The Knockout (KO) Taming Method
Wild Pteranodons are skittish, not aggressive, and the wiki is explicit that this makes ground-level knockouts hard: "The Pteranodon will flee as soon as it is hit, which makes it difficult to knock it out from the ground." Its own fix is the Bola — "it can be immobilized with Bolas beforehand, which makes it easy to capture any Pteranodon while it is on the ground resting." The wiki also names a shortcut: "A standard Electric Prod will instantly knock-out any Pteranodon that is level 120 or lower if hit directly in the head." That's a hard cutoff at level 120 for the instant-KO Prod — above that, the page doesn't say the Prod still works, so treat 120 as the documented ceiling, not a guess.
The bigger risk is overkill: "Pteranodons, especially lower levels, have low health and take extra damage from ranged attacks, making it very easy to accidentally kill one with a Tranquilizer arrow or even a stone." Even high-level Pteranodons "can often be knocked out with just one arrow" — go in light on ammo, not heavy. One more documented hazard: "the Pteranodon can accidentally fall into deep water and drown, so make sure that you do not knock it out over bodies of water."
Best Taming Foods
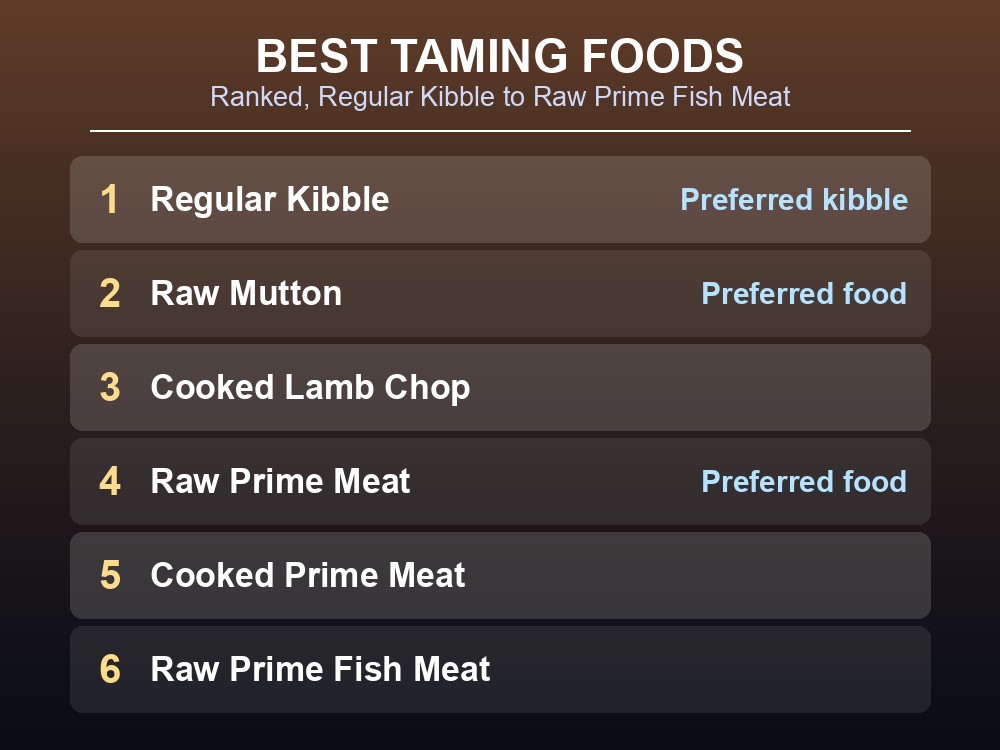
The infobox lists two separate "Preferred Kibble" entries — Regular Kibble and Kibble (Dodo Egg) — and two separate "Preferred Food" entries — Raw Mutton and Raw Prime Meat — exactly as the source presents them, without collapsing them into one "best" pick. Regular Kibble is crafted from 1× Cooked Meat Jerky, 1× Medium Egg, 5× Fiber, 2× Longrass, 2× Savoroot, 1× Water, per the wiki's ingredient list.
The Level 1 taming table lists these foods in this row order: Regular Kibble, Raw Mutton, Cooked Lamb Chop, Raw Prime Meat, Cooked Prime Meat, Raw Prime Fish Meat, Raw Meat, Cooked Prime Fish Meat, Cooked Meat, Raw Fish Meat, Cooked Fish Meat — all 11 rows the table lists, not a partial pull. That table also carries four more numeric columns per food between the food name and the "Time" column; the source's rendered text dropped their headers, so this guide doesn't assign them a meaning (quantity, narcotic, or otherwise) — that mapping is undocumented here.
Level 1 Feeding Time and Torpidity Decay
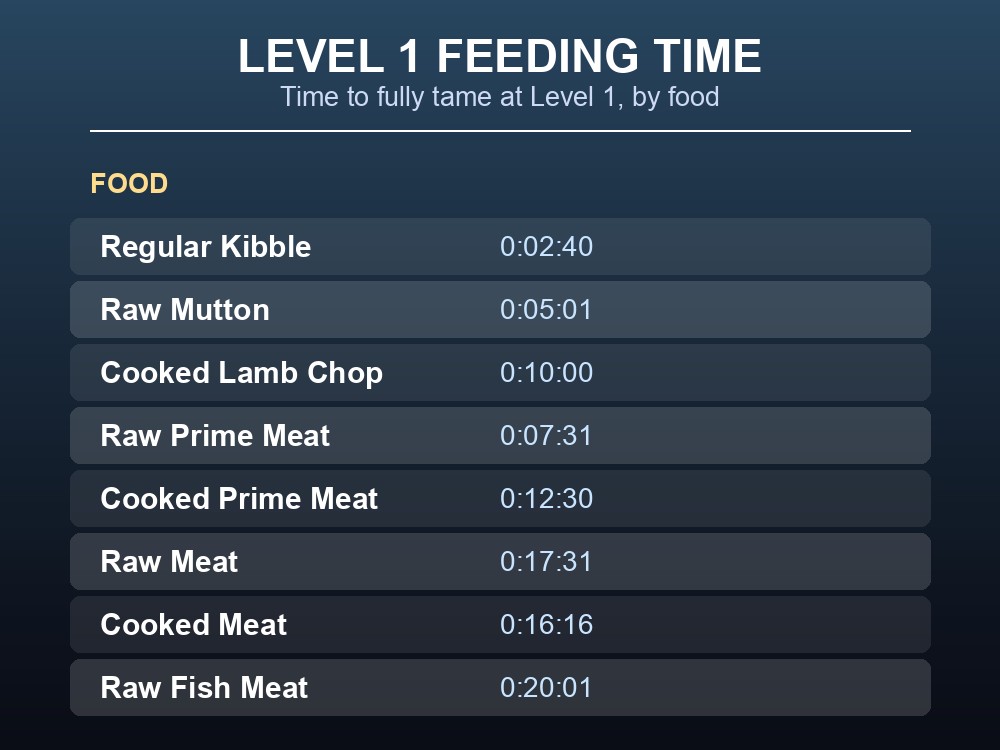
For a Level 1 Pteranodon, the wiki's "Time" column gives feeding duration per food: Regular Kibble 0:02:40, Raw Mutton 0:05:01, Raw Prime Meat 0:07:31, Cooked Prime Meat 0:12:30, Raw Meat 0:17:31, Cooked Meat 0:16:16, Raw Fish Meat 0:20:01 — listed in the same order the wiki's own table presents them.
The page states torpidity decay directly: at Level 1, "Torpidity-depletion: 0.3/s, Time until all torpidity is depleted: 00:06:40." At Level 150, the same line reads "Torpidity-depletion: 1.04/s, Time until all torpidity is depleted: 00:19:12." Doing the arithmetic: 6:40 is 400 seconds, 19:12 is 1,152 seconds, and 1,152 ÷ 400 ≈ 2.88 — a Level 150 Pteranodon gives almost three times the feeding window of a Level 1 before it wakes up. One figure this guide won't put a number on: the source's bare line "KO: × 12; × 5; × 2; × 1; × 1; × 1" lists six counts with no weapon or tool name attached in the extracted text, so which knockout method each count belongs to is undocumented here.
Saddle Level, Base Stats, and Where to Find One
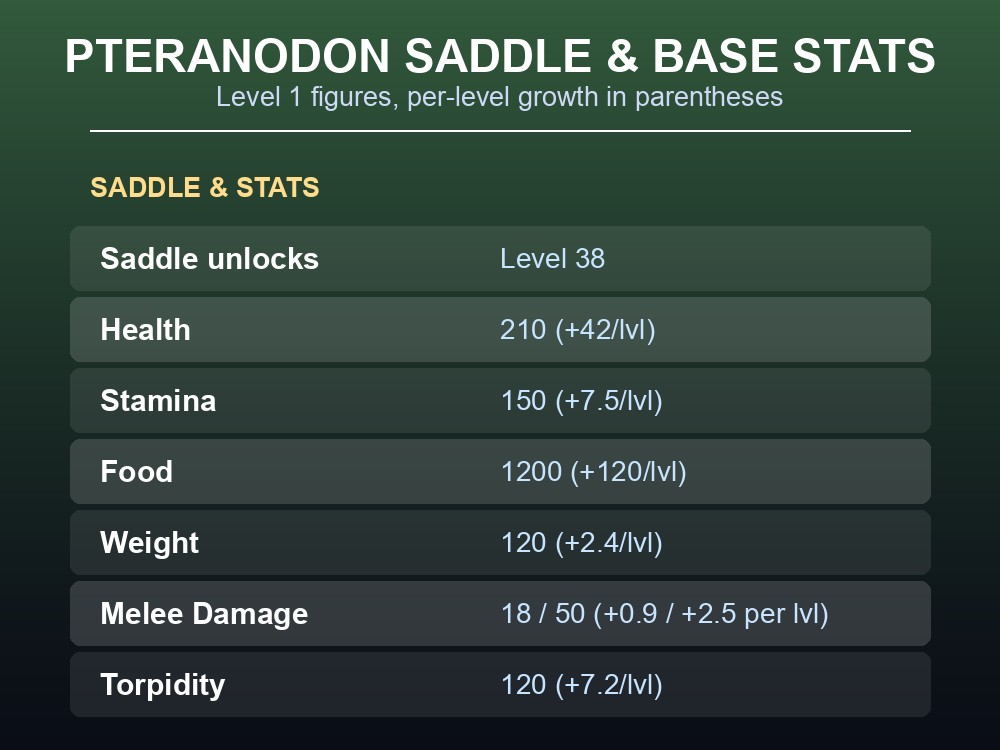
The Pteranodon Saddle unlocks at Level 38, per the infobox's Equipment field. Base stats at Level 1: Health 210 (+42/level), Stamina 150 (+7.5/level), Oxygen 150 (+15/level), Food 1200 (+120/level), Weight 120 (+2.4/level), Torpidity 120 (+7.2/level), Movement Speed 100% (+0%/level). Melee Damage is listed as two values, 18 / 50, with the wiki noting "the second value of the Melee Damage displays the value for the aileron roll attack" — 18 is the base Peck, 50 the Barrel Roll, growing +0.9 and +2.5 per level respectively. Arithmetic example on Health: at Level 30, that's 210 + 42 × 29 = 210 + 1,218 = 1,428 Health.
The habitat section names these maps for Pteranodon spawns: The Island, The Center, Ragnarok, Extinction, Valguero, Genesis: Part 1, Crystal Isles, Genesis: Part 2, Lost Island, Fjordur, Midgard, Asgard, and Vanaheim. That section also carries a rarity legend (Common / Rare / Untameable / Cave), but the extracted text doesn't cleanly attach any rarity tag to any specific map — so this guide names the maps without claiming which are common versus rare; that split is undocumented here.
Bola, Chain Bola, Bear Trap, Large Bear Trap, Plant Species Y Trap, and Net Projectile are the wiki's full list of things that immobilize a Pteranodon — use one before you ever fire a tranq. Wild ones turn hostile only if you steal their egg or they eat a Rare Flower, and non-bullet ranged weapons deal extra damage to them per the wiki's Weakness note, so a stray Bow or Crossbow shot can kill a low-level bird instead of knocking it out. Keep the attempt away from open water — an unconscious Pteranodon can drown.
Running your own ARK server
A fast, low-health tame like the Pteranodon is exactly what a random server session can ruin — a griefer landing on your Bola trap, or a scheduled restart mid-feed, can cost the whole attempt. A dedicated ARK server keeps your trap standing, your Regular Kibble stockpile in the fridge, and your knocked-out Pteranodon exactly where you left it, with no other tribe anywhere near it. It also makes the wiki's own Fighter Plane Squadron tactic — several AI Pteranodon flying alongside a rider — realistic to actually build, since your tames stay put between sessions instead of scattering.
Conclusion
Taming a Pteranodon comes down to what ark.wiki.gg documents: immobilize it with a Bola or headshot it with an Electric Prod (instant KO at level 120 or below), feed it Regular Kibble or Raw Mutton first, expect roughly 2 minutes 40 seconds of feeding at Level 1 with Regular Kibble, and have a saddle ready by Level 38. What isn't in the source and isn't guessed here: the meaning of the taming table's four unlabeled numeric columns, which knockout tool the bare "KO" count list refers to, and which specific maps count as common versus rare spawns.
Ready to tame your own Pteranodon without losing the attempt to someone else's server? Spin up your own ARK server and get taming. Use promo code WELCOME for your first month free.