
How to Set a Welcome Message (MOTD) on Your Project Zomboid Server
A welcome message — sometimes called an MOTD ("message of the day") — is the text that greets players in the chat panel as soon as they connect to your Project Zomboid server. It's the perfect place for your rules, a Discord invite, or just a friendly hello. Project Zomboid stores it in a single line in your server's main .ini file, ServerWelcomeMessage. This guide shows how to set and format it in the gamever File Manager.
Where the welcome message lives
The welcome message isn't one of the fields on Settings → Server Settings — it's a line inside your server's main config file. On a gamever server that file is <Server name>.ini, and it sits in /home/configs/Server/.
Open the File Manager and go to /home/configs/Server/:
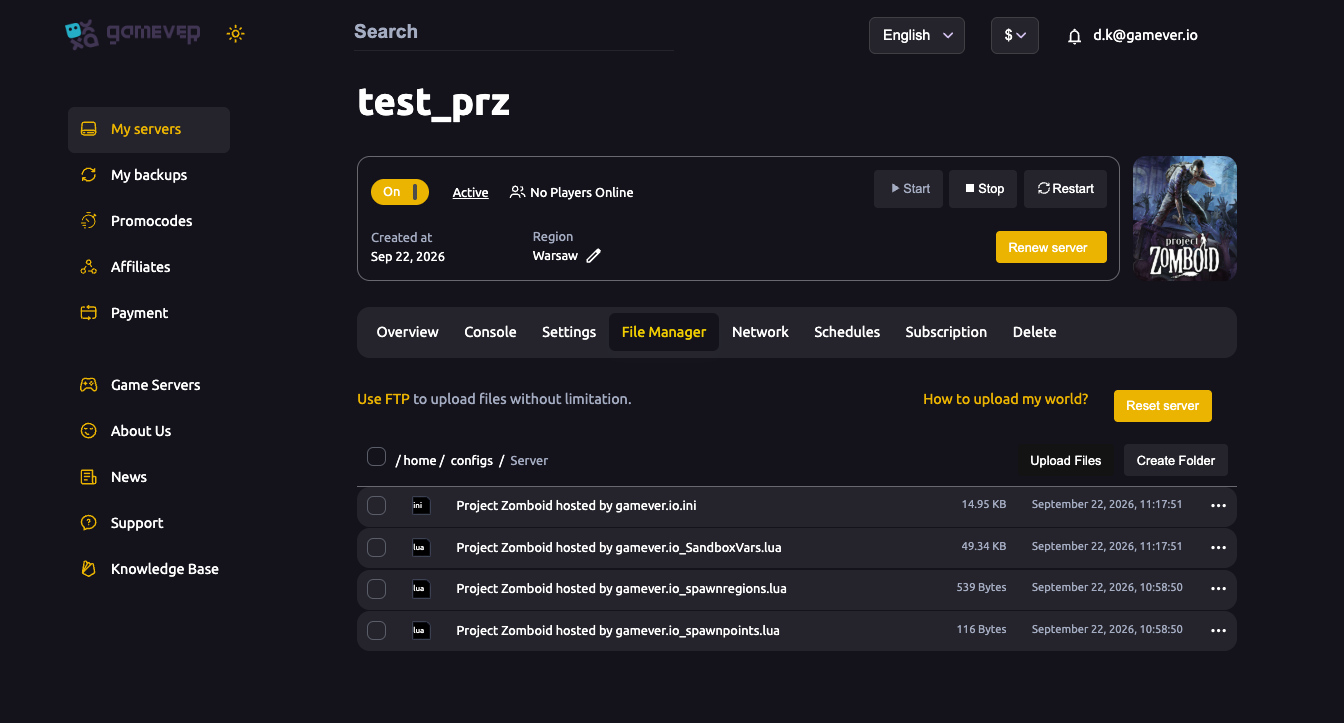
The folder also holds your <Server name>_SandboxVars.lua (difficulty) and the spawn files — see sandbox settings if you want to tune those while you're here.
Setting the message
- Stop the server first (Overview → Stop). The server writes to its config on shutdown, so editing while it's running risks your change being overwritten.
- In the File Manager, open
/home/configs/Server/<Server name>.iniin the built-in editor. - Find the line that begins
ServerWelcomeMessage=. Everything after the=is your message. - Type the text you want players to see, for example:
ServerWelcomeMessage=Welcome to our server! Read the rules and join our Discord.
- Save the file, then Start the server.
When a player connects, your message appears in their chat/text panel. Keep it reasonably short — players only glance at it on join, so lead with the important bit (rules, Discord link) rather than burying it.
Formatting: line breaks and colour
Project Zomboid lets you format the welcome message with two tags. These are Project Zomboid's own tags — they are not standard HTML, so other HTML tags won't work.
| Tag | What it does |
|---|---|
<LINE> | Starts a new line in the message. |
<RGB:r,g,b> | Colours the text that follows. Each of r, g, b is a value from 0 to 1 (not 0–255). |
Some common colours, written as <RGB:r,g,b>:
| Colour | Tag |
|---|---|
| Red | <RGB:1,0,0> |
| Green | <RGB:0,1,0> |
| Blue | <RGB:0,0,1> |
| Yellow | <RGB:1,1,0> |
| White | <RGB:1,1,1> |
A colour tag applies to everything after it until the next tag, so put a fresh <RGB:…> at the start of each line you want to re-colour. A multi-line, coloured example:
ServerWelcomeMessage=<RGB:0,1,0> Welcome to our server! <LINE> <RGB:1,1,1> Please read the rules and join our Discord. <LINE> <RGB:1,0,0> Stay safe out there, survivor.
That shows a green greeting, a white line of instructions, and a red sign-off, each on its own line.
Note: the exact wording of the stock default message and any hard character limit vary between game versions and aren't documented in a single authoritative place, so we don't quote them here — just write your own message and keep it short.
Additional Tips
- Stop the server before editing, then start it again — this is how the change takes effect, and it prevents your edit being overwritten.
- Lead with what matters — rules or a Discord link first, greeting second; players only see the message briefly on join.
- One
<RGB:…>per line — the colour carries until the next tag, so re-state it after each<LINE>. - Values are 0–1, not 0–255 —
<RGB:1,0,0>is full red,<RGB:0.5,0.5,0.5>is grey. - If the message looks broken or empty, you probably saved the file while the server was still running — stop it, re-save, and start again.
- Keep a copy of your
.inichanges; a quick FTP download before editing means you can always revert — see backup & restore.
Conclusion
A welcome message is one line in your server's main config, and gamever puts that file one click away in the File Manager. Stop the server, open /home/configs/Server/<Server name>.ini, edit the ServerWelcomeMessage= line — add <LINE> for breaks and <RGB:r,g,b> for colour — then save and start. Your players get a clear, branded greeting the moment they join. For the rest of your core setup, see server settings explained.
Rent your Project Zomboid server at gamever.io — a built-in file editor and full FTP so you can shape every line of your config. Free trial, promo code WELCOME.