How to make an anvil in Minecraft
Imagine yourself engaged in a fierce sword fight within the virtual world of Minecraft, only to witness your sword shatter right before delivering the final blow to a formidable enemy. Or picture yourself deep in the depths of an underground cave, tirelessly mining for resources, only to realize that your trusty pickaxe is on the brink of breaking, leaving you stranded without a means to ascend back to the surface. These distressing scenarios haunt Minecraft players who are unfamiliar with the crucial role of an anvil. This remarkable utility block is the key to upgrading and maintaining all your gear in the game. However, mastering the intricacies of the anvil can be a challenging task. Therefore, to eliminate any confusion, let us delve into the realm of Minecraft and acquire comprehensive knowledge about the workings of the anvil.
The functionality of an anvil relies on a variety of game mechanics, each deserving its own dedicated explanation. To ensure clarity, we have provided a detailed breakdown of each aspect. Refer to the table below to gain a comprehensive understanding of everything you need to know about the anvil in Minecraft.
In Minecraft, the anvil serves as a utility block that enables players to repair items, rename them, and even modify enchantments. While an anvil can be naturally found in woodland mansions, it can also be crafted with relative ease. If you wish to embark on enchanting endeavors within the world of Minecraft, acquiring an anvil is an absolute necessity.
Required Items for Crafting an Anvil
To craft an anvil in Minecraft, you will need the following items:
- 31 Iron Ingots (27 of which will be used to create iron blocks)
- 3 Iron Blocks (crafted using iron ingots)
- Crafting Table
As you can observe, crafting an anvil demands a substantial amount of iron. Hence, your first task is to locate and mine iron ore. Our Minecraft 1.19 ore distribution guide can assist you in swiftly discovering the coveted iron ore. Once obtained, you must smelt all the raw iron in a furnace until you possess 31 iron ingots in your inventory.
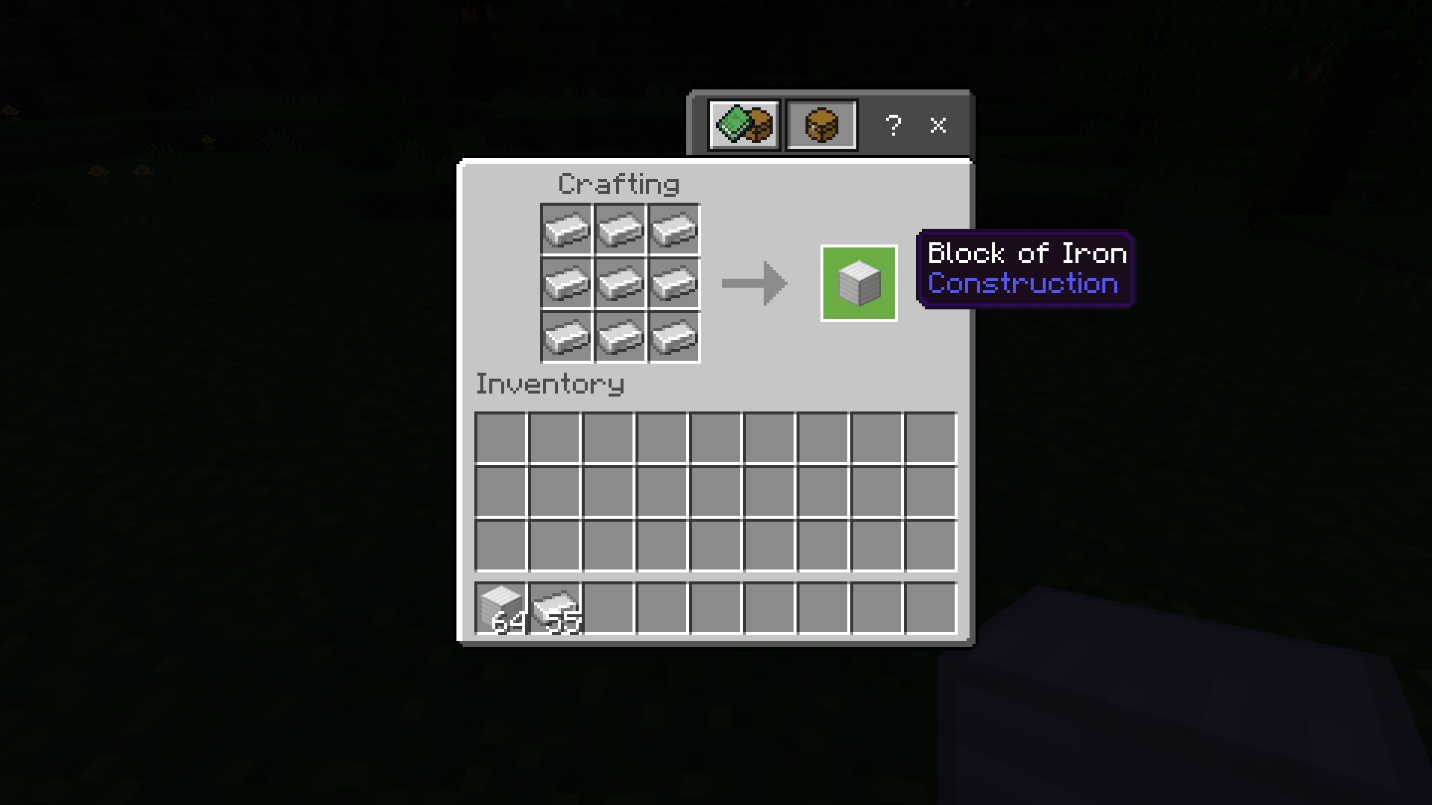
Additionally, by placing nine iron ingots on the crafting table, filling all the spaces, you will form a block of iron. The recipe for crafting an anvil necessitates 3 blocks of iron, leaving you with 4 remaining iron ingots to utilize as is.
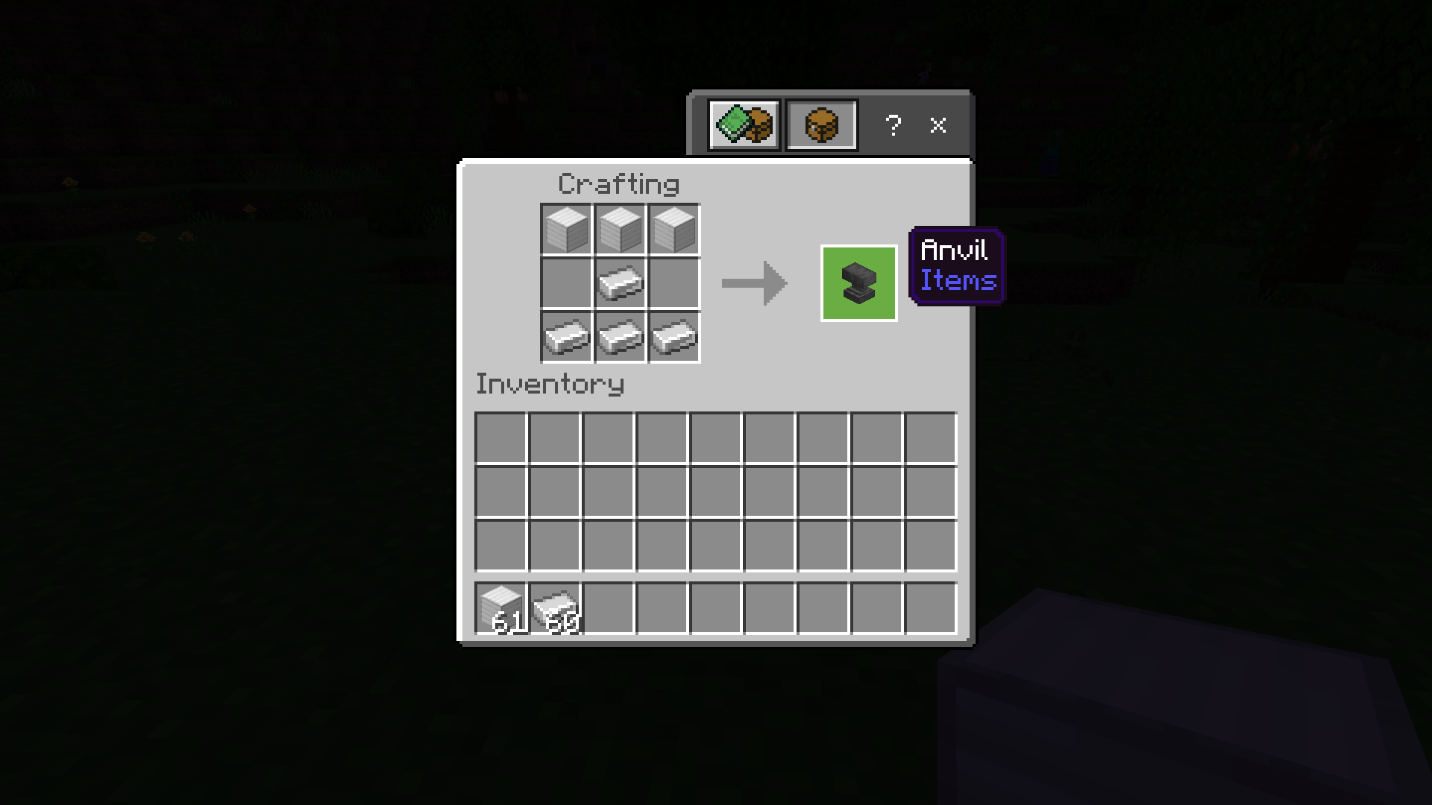
Minecraft Anvil: Crafting Recipe
With all the required materials at hand, crafting an anvil becomes a straightforward process. Follow the step-by-step instructions below to successfully craft an anvil in Minecraft:
1. Begin by placing three blocks of iron in the top row of the crafting grid.
Three Iron Blocks
2. Subsequently, position an iron ingot in the middle cell of the second row.
Iron Ingot and Iron Blocks
3. Lastly, fill the bottom row of the crafting table by placing iron ingots in each cell. And voila! You have now crafted an anvil in Minecraft.
Utilizing an Anvil in Minecraft
The anvil in Minecraft offers a multitude of functionalities. Let's explore each of its uses individually to gain a comprehensive understanding.
Repairing: By adding an ingot of the corresponding material to a damaged tool on an anvil, you can effectively repair it. Alternatively, you can combine two damaged items to restore their durability. This mechanic is akin to utilizing a grindstone, but it allows you to retain the enchantments on the repaired items.
Renaming: Placing an item in an anvil allows you to easily assign a new name or rename the item according to your preference.
Enchanted Books: Anvils enable you to combine enchanted books with tools, effectively transferring the enchantments onto the tools.
Weaponry: Unlike most blocks in Minecraft, anvils are subject to gravity. Therefore, if positioned in a floating state adjacent to another block, they will fall downward. During the descent, anvils can cause damage to entities beneath them.
Maps Editor: In Minecraft Bedrock Edition, anvils can be employed to expand and edit maps.
Cost of Using an Anvil in Minecraft
When utilizing an anvil, each action incurs an "enchantment cost." This cost is the cumulative expenditure associated with performing an action on an item, such as renaming, repairing, or enchanting it. The cost depends on the repair level and the specific action performed on the anvil.
Expenditure Limit
The enchantment cost is paid using your in-game experience level. If you anticipate frequent usage of the anvil, it is advisable to learn how to create a Sculk XP farm in Minecraft. However, once an action exceeds a cost of 40 levels, the item becomes "too expensive" for the anvil. Consequently, further renaming, repairing, or enchanting of the item becomes unfeasible.
Anvil Durability
With each use, anvils have a slight chance of sustaining damage. On average, an anvil remains functional for approximately 25 uses before becoming completely depleted. Additionally, anvils can be damaged or destroyed if they fall from a significant height, as the impact inflicts more damage.
Using an Anvil in Minecraft
Minecraft offers various methods to utilize an anvil. Let's explore the different use cases to enhance our understanding.
Creating Name Tags
Naming via Anvil
The anvil allows you to rename individual items or groups of items. To do so, simply enter the desired name in the designated field at the top of the anvil's user interface. Once renamed, Minecraft assigns the item its new name. Moreover, you can utilize name tags in conjunction with an anvil to assign custom names to mobs.
Although the naming mechanic may seem straightforward, it can yield interesting effects in certain situations. Here are a few examples:
In Java Edition, you can rename mobs trapped in buckets by placing the respective bucket in an anvil. The mobs will retain their names even after being removed from the anvil. The same principle applies to spawn eggs of mobs.
Once an item is named, it cannot be stacked with items of a different name or items without a name, even if they are of the same type.
Functional blocks such as enchanting tables display their own names in the anvil's user interface.
By using name tags in conjunction with an anvil, you can assign special names to mobs and unlock intriguing Easter eggs. For instance, naming a mob "Dinnerbone" causes it to appear upside down in Minecraft.
Repairing Items
Repairing Items via Anvil
To repair a damaged tool in Minecraft, simply place the tool in the anvil and combine it with another identical tool. This process allows you to resume your adventures with a fully functional tool.
Alternatively, you can repair an item by using an ingot of the same material used to craft the damaged item. In certain unique cases, unrelated materials can be employed to repair specific items. For instance, elytra can be repaired using a phantom membrane.
Enchanting Items
Enchanting via Anvil
By combining a tool with an enchanted book on an anvil, you can transfer the enchantment from the book onto the tool. However, it is important to note that this process only works with enchantments compatible with the specific tool type. Furthermore, the enchanted book should be placed in the middle slot of the anvil, while the item to be enchanted should occupy the left slot.
Falling Anvils
Falling Anvils in Minecraft
As mentioned earlier, when anvils are placed in a floating position, they are subject to gravity and will fall downward. This mechanic can be utilized to eliminate mobs by strategically dropping anvils on top of them. Additionally, falling anvils can be employed to obliterate dropped items, erasing them from existence.
In conclusion, mastering the functions of the anvil in Minecraft is essential for enhancing gameplay and ensuring the longevity of your gear. Whether it's repairing tools, renaming items, enchanting equipment, or utilizing anvils as weapons, the possibilities are vast. Embrace the power of the anvil and unleash your creativity within the captivating world of Minecraft.
Conclusion
Now that you have a comprehensive understanding of the anvil and its various uses in Minecraft, it's time to take your gameplay experience to the next level. To fully explore the possibilities and enjoy a thriving Minecraft community, we recommend playing on the Gamever servers.
Gamever Servers provides a reliable and immersive multiplayer experience that allows you to connect with players from around the world. With a dedicated community and a wide range of game modes, you'll find endless opportunities to collaborate, compete, and showcase your skills.
By joining Gamever Servers, you can engage in exciting PvP battles, team up with friends to conquer challenging dungeons, or showcase your creativity in building competitions. The servers offer a stable and lag-free environment, ensuring a smooth and enjoyable gameplay experience.
Additionally, Gamever Servers regularly updates its features and introduces new content to keep the gameplay fresh and exciting. You can expect a vibrant and active community, with events, tournaments, and regular updates that enhance your Minecraft adventures.
Whether you're a seasoned player looking for new challenges or a beginner seeking a supportive community, Gamever Servers provides a welcoming and inclusive environment for players of all skill levels.
Don't miss out on the opportunity to join a thriving Minecraft community and elevate your gameplay experience. Visit the Gamever Servers website and start your adventure today. Prepare to immerse yourself in a world of endless possibilities and forge new friendships as you explore the vast realms of Minecraft on Gamever Servers.