
How to Install Steam Workshop Mods on Your Soulmask Server

Soulmask is one of the friendlier survival games to mod, because Qooland Games ships official Steam Workshop support for the dedicated server. That means you don't download or compile anything yourself — on a server you rent from gamever, you tell the panel which Workshop items to run, and the server fetches and loads them for you on the next restart. This guide covers how to find a Workshop mod's ID, add one or several through your control panel's Mod Settings, and the compatibility rules that keep a modded server stable for everyone who joins.
Where mods are configured: Settings → Mod Settings
Open your server in the gamever panel and go to the Settings tab, then the Mod Settings sub-tab. There is a single field here, Steam Mods, which takes a comma-separated list of Steam Workshop IDs. The placeholder text (88484848,28283883...) shows the format: numbers only, separated by commas, no spaces needed.
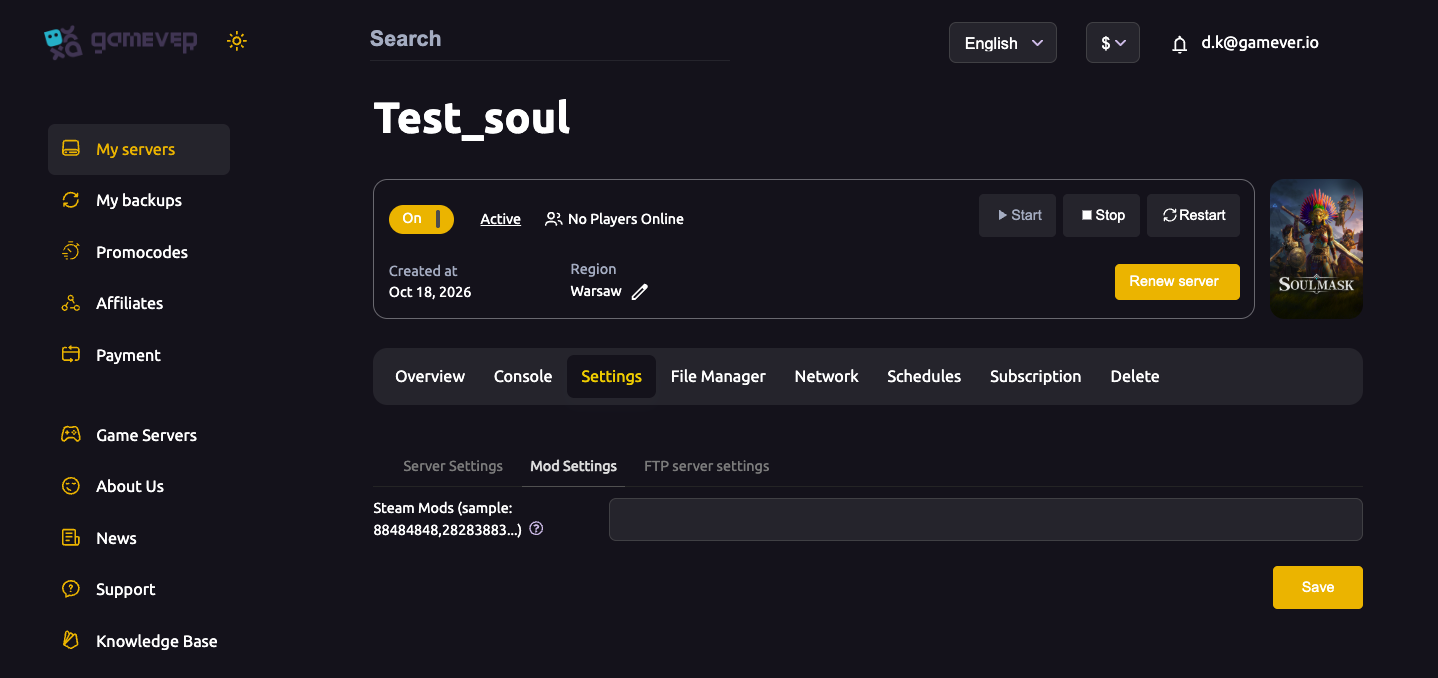
This is the whole mechanism. You don't upload mod files, and you don't manage install folders — where the mod files land on the server is handled by us. When you save a list of IDs and restart, the server downloads each listed Workshop item and loads it automatically.
| Step | Where | What you do |
|---|---|---|
| 1 | Steam Workshop (browser) | Find each mod and copy its numeric ID |
| 2 | Settings → Mod Settings | Paste the IDs into Steam Mods, comma-separated |
| 3 | Settings | Click Save |
| 4 | Overview | Restart the server to download and load the mods |
Finding a mod's Steam Workshop ID
Every Soulmask mod on the Steam Workshop has a numeric ID, and it's the easiest part of the URL to spot. Open the mod's Workshop page in a browser and look at the address bar — the ID is the number after ?id=:
https://steamcommunity.com/sharedfiles/filedetails/?id=3324057706
In that example the ID is 3324057706. Many mod authors also list the ID in the description for convenience. Browse the Soulmask Workshop from the game's Steam page (Community → Workshop), subscribe to anything you like so you can find it again, and note down each ID you want on the server.
Adding one or several mods
To run a single mod, put its ID in the Steam Mods field on its own. To run several, separate the IDs with commas:
3324057706,3301234567,3299887766
Order in the list is the load order. If a mod's own Workshop page says it must load before or after another mod (common for mods that extend a shared framework), arrange the IDs accordingly — put the dependency first. Once the list is correct, click Save, then go to the Overview tab and Restart the server. On boot the server pulls each item from the Workshop and loads it; this first restart can take a little longer than usual while the downloads complete.
You don't need to touch the Network tab for any of this — your server's game and Steam query ports are panel-assigned and already open, so a modded server is reachable exactly like a vanilla one.
Every player must have the same mods
This is the rule that trips up most new modded servers. Soulmask requires the client and server mod lists to match: a player whose subscribed mods don't line up with the server's list is refused at the join screen and prompted to subscribe to the correct ones. So after you settle on a mod list, share it with your group and have everyone subscribe to every mod on it in the Steam Workshop before they try to connect. Subscribing makes Steam keep each player's local copy up to date automatically.
Treat the list as something you change together, not individually. If you add or remove a mod on the server, tell your players so they can update their subscriptions to match — otherwise they'll be bounced on their next join.
Test on a backup first
Mods are third-party code, and a bad combination can corrupt a world or stop the server booting. Before you add mods to a world you care about, make a backup from My backups in the left sidebar, or spin the list up on a fresh world first. That way, if a mod misbehaves, you can roll back cleanly instead of losing progress. This matters especially after a game update — Soulmask's 1.0 release broke a large share of older mods, and major patches since have done the same, so check each mod's Workshop page shows recent activity on the current game version before you trust it on your main server.
Additional Tips
- Confirm vanilla first. Make sure the plain server runs and everyone can join before you add a single mod, so you know a later problem is the mods and not the setup.
- Add mods a few at a time. If a modded server won't boot or crashes, a long all-at-once list makes the culprit hard to find. Build the list up in small steps and restart between them.
- Read each mod's page for load order and dependencies. Some mods require a framework or library mod to be present; add those IDs too, and respect any stated order.
- Keep a written mod list. Pin the exact IDs and versions somewhere your group can see, so nobody joins with a stale or missing mod.
- Watch the Console on restart. The Console tab shows the server loading mods on boot — a download or version error surfaces here first.
- Blueprints aren't mods. Shared building Blueprints are loaded in-game, not through the Steam Mods field — don't put those IDs in the mod list.
Conclusion
Modding a Soulmask server comes down to three things: get each mod's Workshop ID from its page URL, paste the comma-separated list into Settings → Mod Settings → Steam Mods, then Save and Restart. We handle the download and the file placement for you, so there's no manual install step. The one discipline that keeps a modded server healthy is matching: every player must subscribe to the same mods as the server, and you should test new mods on a backup before committing them to your main world. For the rest of your server options see server settings, and keep both game and mods current with updating your server.
Rent your Soulmask server at gamever.io — official Steam Workshop support, one-click backups before you experiment, and a panel that handles the mod files for you. Free trial, promo code WELCOME.