
How to Install Oxide (uMod) on Your Rust Server

Oxide (uMod) is the modding framework that powers the vast majority of Rust plugins — kits, teleport, gather-rate controllers, PvE protection and thousands more. Before you can run any of them, your server needs Oxide installed. On gamever that's a toggle in the panel, not a manual download. This guide shows how to enable it and where your plugins go afterwards.
Enable Oxide in the panel
You have two places that control this; use either:
- Settings → Mods Settings → Install Oxide → set to Yes, then Save.
- Or Startup → Enable Oxide → Enable, then Save.
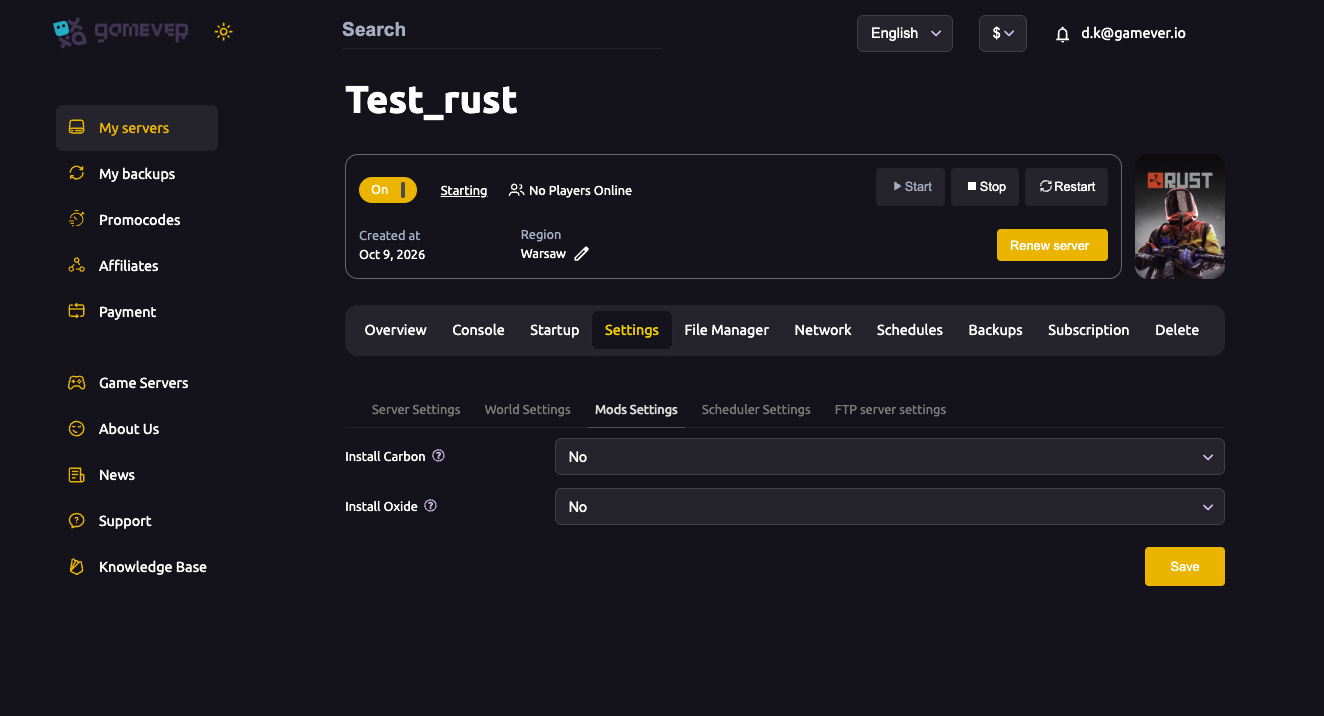
Oxide changes are applied on reinstall/restart. After enabling Oxide the server needs to reinstall the framework, so Restart it. The Startup tab notes this explicitly ("you'll have to reinstall the server" to apply the change).
Oxide or Carbon — not both. Oxide (uMod) and Carbon are competing frameworks. Enable one, not both. If you want Carbon instead, leave Install Oxide on No.
Where your plugins go
Once Oxide is installed and the server has restarted, an oxide folder appears in your server's identity folder (the same folder that holds cfg/). Inside it:
| Folder | What it holds |
|---|---|
oxide/plugins | The plugin files themselves — drop .cs files here. |
oxide/config | Each plugin's JSON config (created on first load). |
oxide/data | Plugin data files. |
oxide/lang | Language/translation files. |
To add a plugin: download its .cs file, then upload it to oxide/plugins via the File Manager (or FTP for larger batches, using the credentials in Settings → FTP server settings). Oxide auto-loads new plugins within a few seconds; no restart needed for most.
Managing plugins from the console
Use the Console tab (or RCON) for quick plugin control:
| Command | What it does |
|---|---|
oxide.reload <PluginName> | Reloads a single plugin after you edit its config. |
oxide.unload <PluginName> | Turns a plugin off without deleting it. |
oxide.load <PluginName> | Loads a plugin you've uploaded. |
oxide.plugins | Lists loaded plugins and versions. |
oxide.grant group <group> <permission> | Grants a permission to a group (e.g. oxide.grant group default kits.use). |
For a deeper walkthrough of configs and permissions, see our managing Rust plugins guide.
Additional Tips
- Restart after enabling — Oxide installs on reinstall; the toggle alone doesn't load it until the server restarts.
- One framework only — don't enable Oxide and Carbon together.
- Upload plugins to
oxide/plugins, not the root — Oxide only scans that folder. - Edit configs in
oxide/config, thenoxide.reloadthe plugin so it picks up changes. - Check a plugin's Rust version after a Facepunch update — plugins sometimes need an update before they work on a new build.
Conclusion
Installing Oxide on gamever is a one-toggle job: flip Install Oxide to Yes under Mods Settings (or Enable Oxide on the Startup tab), save and restart. From there, plugins live in oxide/plugins and you manage them from the console. You're ready to run the entire uMod plugin ecosystem.
Rent your Rust server at gamever.io — one-click Oxide or Carbon, full file access for plugins, and a built-in console. Free trial, promo code WELCOME.