
How to Install Mods on Your Core Keeper Server
Core Keeper has official modding support from Pugstorm, and mods are distributed through mod.io — not Steam Workshop. Because your Core Keeper server is already running with us, you don't download anything or set up a loader by hand: the gamever control panel exposes the mod.io connection directly on the Settings tab, and a small set of mod files live in the File Manager. This guide walks through enabling mods on a server you rent from gamever, using those panel fields, and explains why every player needs the same mods for a modded world to work.
How Core Keeper modding works
Core Keeper mods are built with Pugstorm's official ModSDK and published on mod.io (browse the catalogue at mod.io/g/corekeeper, or from the in-game mods menu). Each mod is tagged with the game version it was built against, so a mod built for an older build may not load on a newer one — always check that a mod targets your server's current version before adding it. The dedicated server ships with its own mod loader, which reads the mods you enable at boot; on your gamever server that loader's files sit in the modloader/ folder (more on that below). You don't install or update the loader yourself — the panel manages the server files, and you simply tell it which mods to load.
One important distinction: some mods must be installed on both the server and the client, while others are client-side only. A client-only mod placed on the server can stop it from starting, so only add server-side mods to the panel, and check each mod's own mod.io page to see where it belongs.
Enabling mods from the Settings tab
Open the Settings tab for your server. Core Keeper's settings sit on a single page, and the mod-related fields are at the top.
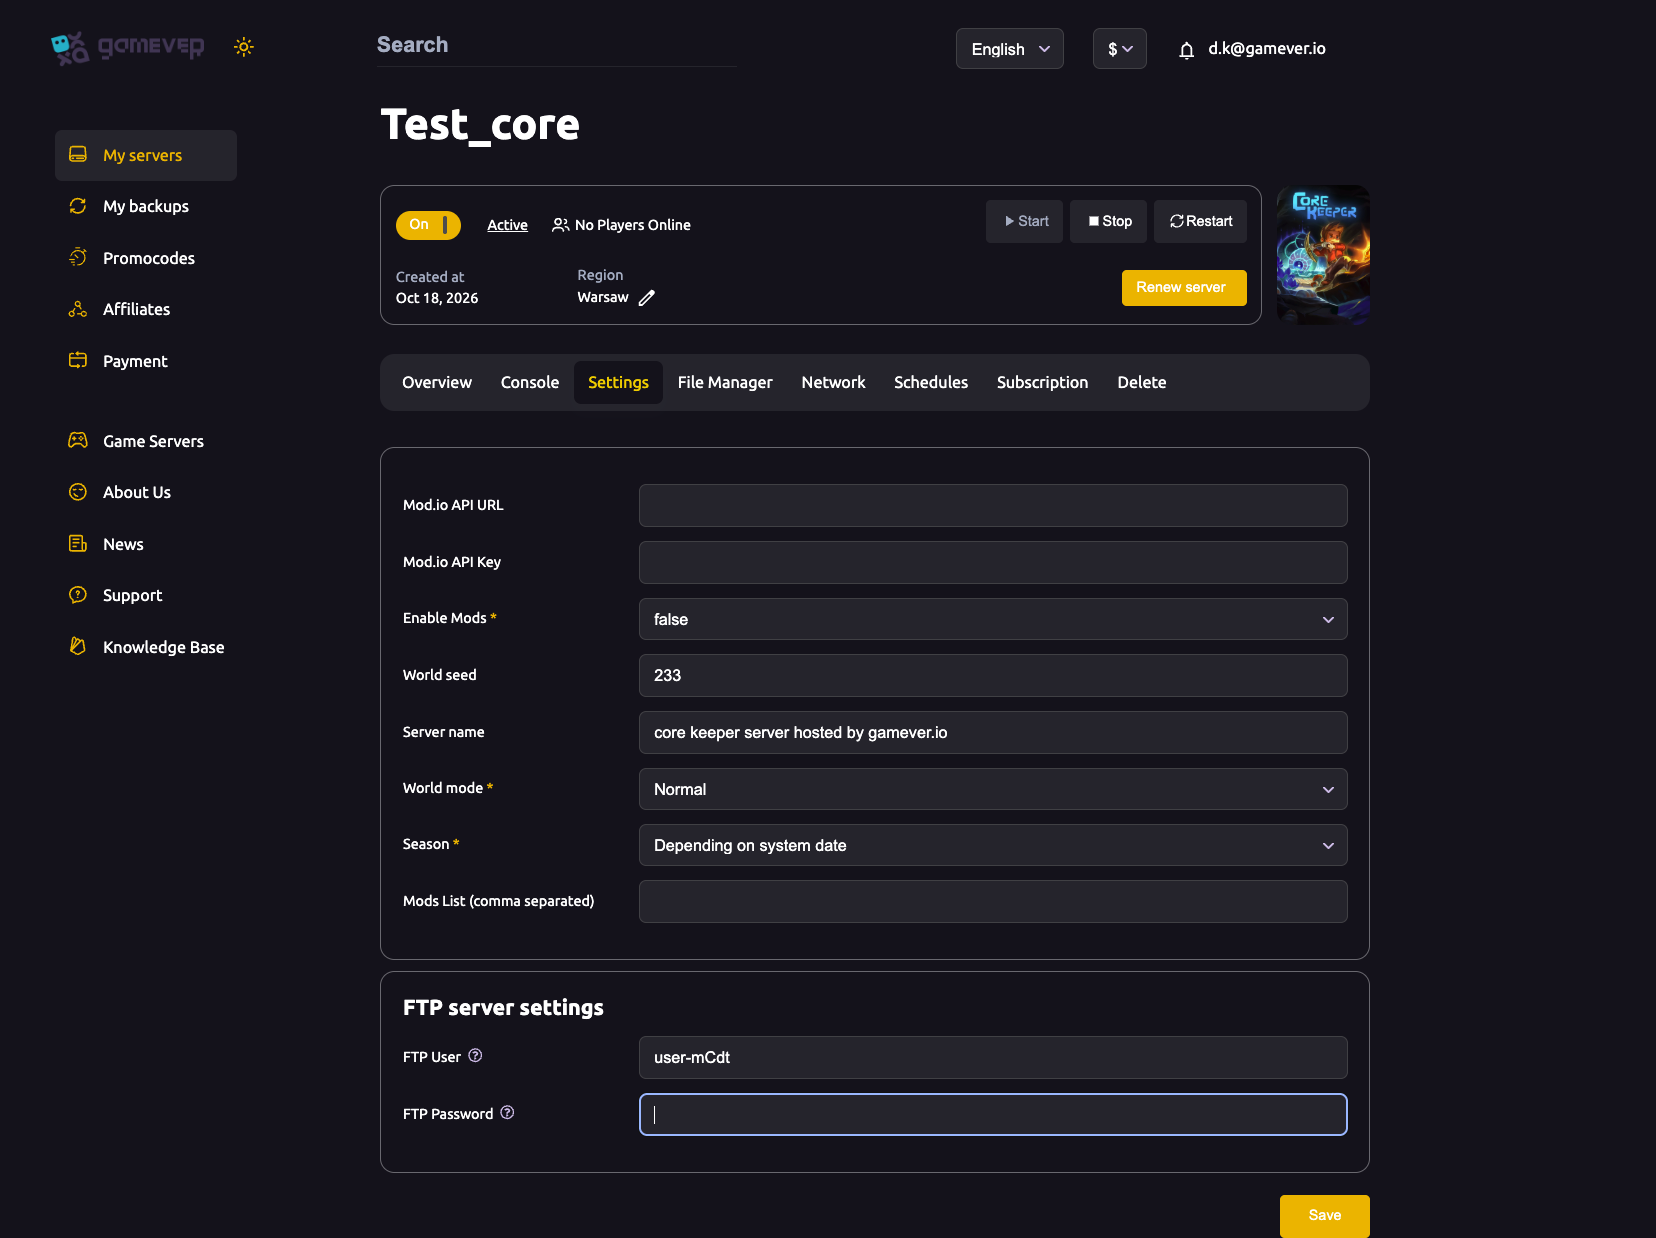
| Field | What to enter |
|---|---|
| Mod.io API URL | The mod.io API endpoint, taken from your mod.io account's API access page. |
| Mod.io API Key | Your personal mod.io API key (see below) — this authorises the server to fetch mods. |
| Enable Mods | Set to true to turn modding on; false disables it. |
| Mods List (comma separated) | The mod.io mod IDs you want loaded, separated by commas. |
Step 1 — Get a mod.io API key
Mods are fetched from mod.io on the server's behalf, which needs an API key tied to a mod.io account:
- Sign in (or sign up) at mod.io.
- Open your account's API access page from your mod.io profile settings.
- Copy the API key shown there, along with the API URL mod.io lists for API requests.
Keep the key private — it identifies your mod.io account. If a key is ever shown only once, store it somewhere safe before leaving the page.
Step 2 — Fill in the panel fields
Back on the Settings tab:
- Paste the mod.io API URL into Mod.io API URL.
- Paste your API key into Mod.io API Key.
- Set Enable Mods to
true.
Step 3 — Add the mods you want
Each mod on mod.io has its own mod ID. Collect the IDs of the server-side mods you want, then enter them into Mods List (comma separated) separated by commas, for example 1234567,2345678. Add only mods that support dedicated-server use at your server's current game version. Note that mod dependencies are not pulled in for you — if a mod lists another mod as a requirement, add that one to the list too.
Step 4 — Save and restart
Click Save at the bottom of the Settings page, then go to the Overview tab and Restart the server to apply. On boot the server fetches the listed mods from mod.io through the loader; watch the Console tab to confirm the mods load without errors. If the server fails to start right after adding a mod, the most likely cause is a client-only or version-mismatched mod — remove it from the list and restart.
The mods and modloader folders
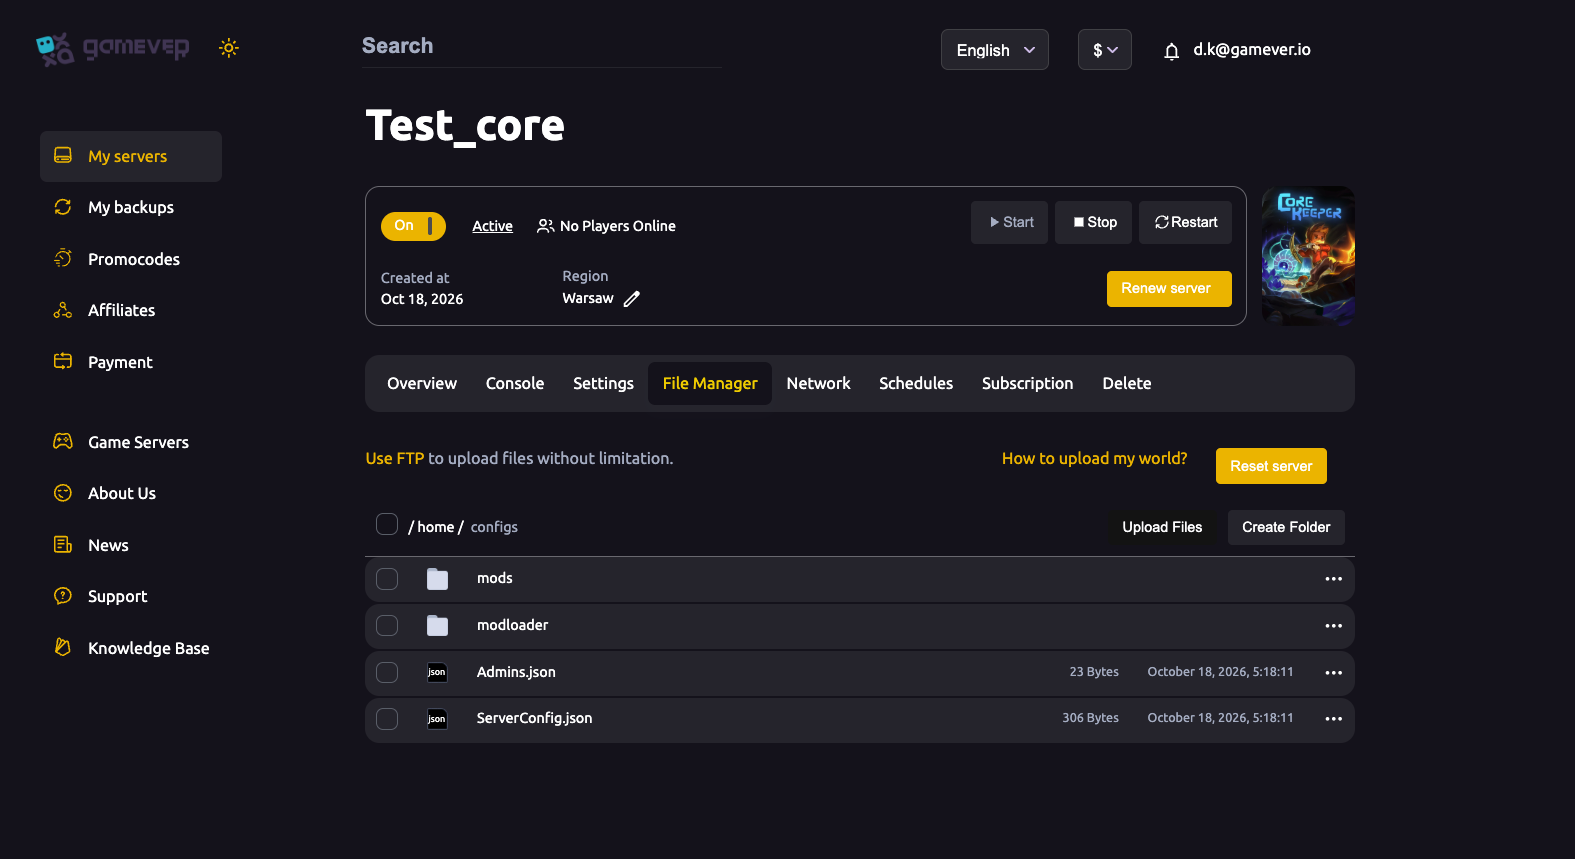
If you prefer to manage mod files directly, or need to confirm what's installed, open the File Manager tab. The Core Keeper config root is /home/configs/, and alongside Admins.json and ServerConfig.json you'll find two mod-related folders.
| Folder | Purpose |
|---|---|
mods/ | Where mod files live on the server. |
modloader/ | The loader files that read and run enabled mods at startup. |
For most setups you won't need to touch these — the Settings fields handle everything through mod.io. If you do edit anything here (for example to remove a mod manually), stop the server first, make your change, then start it again, since these files are read at boot. You can also connect over FTP (get the login from Settings → FTP server settings; the FTP host and port are on the Network tab) if you'd rather manage mod files with a desktop client.
Everyone needs compatible mods
A modded Core Keeper world only works when the server and every player run the same set of compatible mods at matching versions. A mismatch is the usual reason a player can't join or sees broken content. Agree on a mod list with your group, make sure each mod targets the current game version, and update together. For in-game play, players subscribe to the same mods from the mod.io menu so their clients match the server.
Additional Tips
- Start with a plain world. Confirm the server runs unmodded and everyone can join before enabling mods, so you have a known-good baseline.
- Add mods one at a time. If a server won't boot, it's far easier to find the culprit after a single change.
- Watch the Console. The Console tab reports which mods loaded and surfaces errors — your first stop when something goes wrong.
- Mind the game version. Mods are tagged with the build they were made for; after a Core Keeper update, check your mods still target the new version before restarting.
- Keep the API key private. Treat your mod.io API key like a password; don't paste it into public posts or share it.
- Back up before big changes. Take a backup from My backups in the sidebar before adding or removing several mods at once.
Conclusion
Modding Core Keeper on a gamever server is a panel job, not a self-install: paste your mod.io API URL and API key into the Settings tab, set Enable Mods to true, list your mod IDs in Mods List, then Save and Restart. The mods/ and modloader/ folders in the File Manager are there if you need them, but the Settings fields do the work. Keep the server and every player on the same compatible mods and your world stays stable. For the rest of the panel's options, see Core Keeper server settings.
Rent your Core Keeper server at gamever.io — mod.io wired straight into the panel, full File Manager and FTP access, and one-click backups before you experiment. Free trial, promo code WELCOME.