
How to Change Your Core Keeper Server Name

Your Core Keeper server already runs with us — you rent it, and everything is managed from the gamever control panel rather than installed by hand. Naming it is one of the quickest changes you can make: a single Server name field under the Settings tab, saved and applied with a restart. This guide shows exactly where that field lives, what the name actually does for a Game-ID-joined game like Core Keeper, and the matching key in ServerConfig.json if you ever prefer to edit the file directly.
Where a Core Keeper server name shows up
It helps to be honest about what the name does, because Core Keeper doesn't work like a browser-listed shooter. The game's default join route uses Steam's relay network: the server prints a Game ID in the Console each time it boots, and players paste that ID into Join Game to connect. There is no public server browser where your name appears in a long list, and direct IP connection (used for cross-platform joins) is driven by the address and port, not by the name.
So the Server name is best understood as a label for the server/world — it identifies the instance in your gamever panel and in host-side tooling and logs, which matters most when you run more than one server or share admin duties. It does not replace the Game ID as the thing players actually use to connect. Set a clear name for your own organisation and any panel/UI that displays it; hand players the Game ID (and a password, if you've set one) to get them in.
Change the name in the panel
The name lives on the Settings tab, which is a single page of server options:
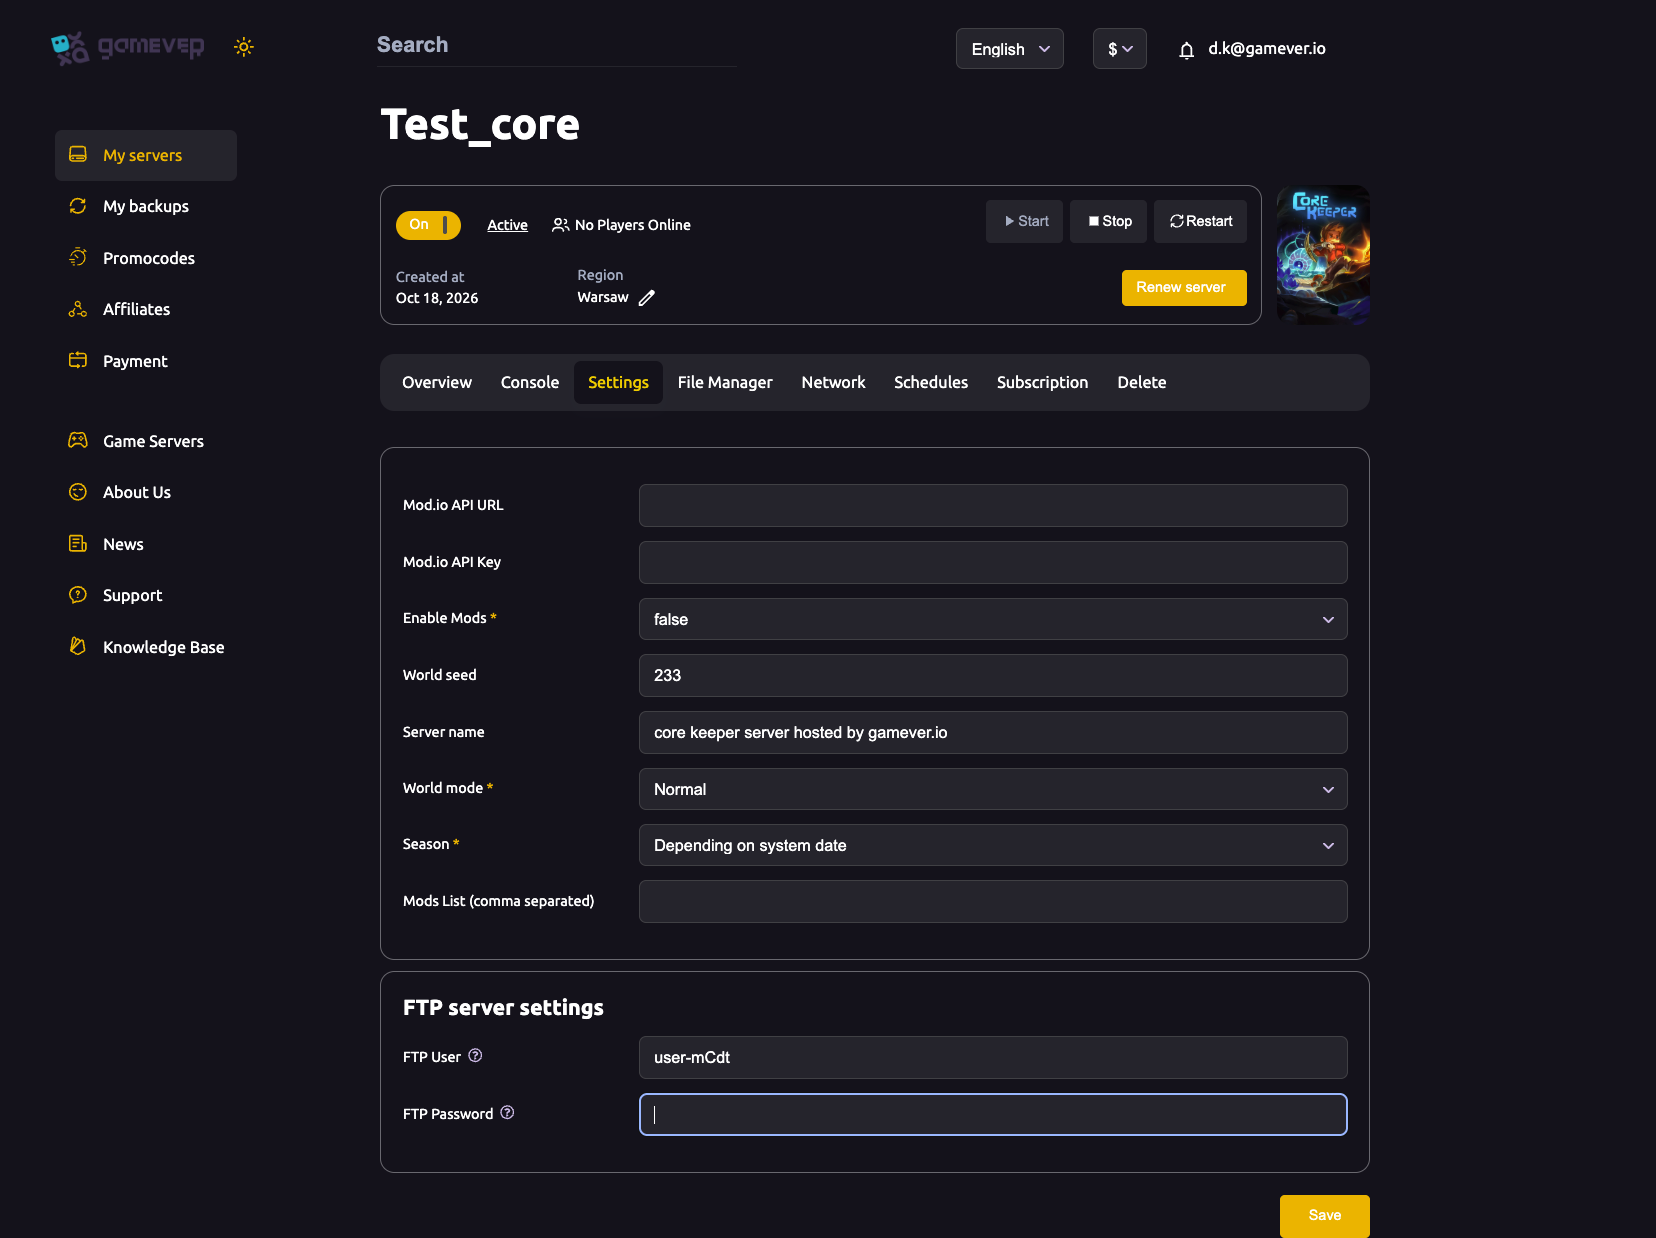
| Field | What to do |
|---|---|
| Server name | Type the name you want, e.g. core keeper server hosted by gamever.io. |
The procedure is:
- Open the Settings tab and find the Server name field.
- Type your new name over the old value.
- Click Save at the bottom of the Settings page.
- Go to the Overview tab and click Restart so the server picks up the change.
The other fields on this page — World seed, World mode, Season and the mod options — are covered separately in Core Keeper server settings; you can leave them untouched when you're only changing the name. Note that the ports and addresses players connect through are shown on the Network tab and are assigned automatically by the panel — you never set or forward a port yourself.
The equivalent key in ServerConfig.json
If you'd rather edit the configuration file, the server's settings live in ServerConfig.json, which you reach through the File Manager (root /home/configs/, alongside Admins.json and the mods folder). The key that holds the display name is worldName — a text string, empty by default:
"worldName": "core keeper server hosted by gamever.io"
A few things to keep in mind when editing the file directly:
- Stop the server first. Core Keeper reads this file at boot, so stop the server from the Overview tab, make your edit, then start it again.
- Keep the JSON valid. A stray trailing comma or a missing quote will stop the server from starting — change only the value inside the quotation marks.
- The name is a label, not the join code. Editing
worldNamedoes the same job as the panel field; it still doesn't change the Game ID that players use to connect.
For almost everyone the panel's Server name field is the easier and supported path — reach for the file only if you're already in there adjusting other values.
Additional Tips
- Keep it short and recognisable. A clear, plain name like
Gamever Co-op Worldreads better in panels and logs than a long string of symbols. - Say what it is. If you run several servers, put the purpose in the name —
CK PvE Main,CK Hardmode Test— so you never restart the wrong one. - Plain characters are safest. Stick to letters, numbers and spaces; exotic symbols can display inconsistently and, in the file, risk breaking the JSON.
- The name isn't a password. It's visible wherever the server is displayed, so never put anything private in it; set an access password in
ServerConfig.jsonif you want to restrict joins. - Pin your Game ID too. If you want a permanent join code that survives restarts, set the
gameIdkey inServerConfig.jsonrather than letting it regenerate each boot — that's the value players actually need, so a stable one saves re-sharing it. - Confirm after restart. Check the Console after the restart to see the server come up cleanly with your changes applied.
Conclusion
Renaming your Core Keeper server is a one-field change: update Server name on the Settings tab, click Save, then Restart from the Overview. Because Core Keeper players join with a Game ID rather than picking a name off a browser list, treat the name as a clear label for your own organisation — and remember the matching worldName key in ServerConfig.json if you'd rather edit the file through the File Manager. For the rest of the options on that page, see Core Keeper server settings.
Rent your Core Keeper server at gamever.io — full panel access to Settings, File Manager and FTP, so your world is yours to name and tune. Free trial, promo code WELCOME.