
How to Add Admins and Manage Players on Your Core Keeper Server
On a Core Keeper server rented from gamever, you manage everything through the control panel — the Settings tabs for day-to-day options, the Console for live commands, and the File Manager for the handful of settings Core Keeper keeps in its config files. Admin rights are one of those file-based settings: they live in Admins.json, not in a panel field. This guide explains how to grant a player admin access the right way, what admins can do once they're in, and how to kick or ban troublemakers — all without any self-install or SteamCMD steps, because your server is already running with us.
Where admins are defined: Admins.json
Core Keeper doesn't expose an admin option in the Settings tab. Instead, admin identities are stored in Admins.json, which you'll find in the File Manager at the server root /home/configs/ (alongside ServerConfig.json and the mods/modloader folders).
The first player to join a fresh Core Keeper server is granted admin automatically, so you often won't need to touch the file at all to get started. To add more admins, or to set up admins before anyone joins, you edit Admins.json directly.
Each admin is an entry inside an adminList array. The two pieces of information Core Keeper actually needs to identify a player are the player's SteamID64 (the 17-digit numeric Steam ID, not a username or vanity URL) and the character name they connect with. A typical entry carries these fields:
| Field | What it holds |
|---|---|
index | A sequential, unique number for the entry (1, 2, 3 …). |
privileges | The admin level — a higher value grants more authority over other admins. |
name | The exact character name the player uses to connect. |
steamId | The player's SteamID64 (17-digit numeric ID). |
The SteamID64 is the load-bearing detail: Core Keeper matches admins by that number, so if it's wrong the entry does nothing. A player can find their SteamID64 via a lookup site such as steamid.io, or from their Steam profile URL. Keep the file valid JSON — a stray comma or missing bracket can stop the admin list loading on the next boot.
Adding an admin, step by step
Core Keeper only reads Admins.json at startup, so you must stop the server before editing it:
- On the Overview tab, click Stop and wait for the server to go fully offline.
- Open the File Manager and go to
/home/configs/.
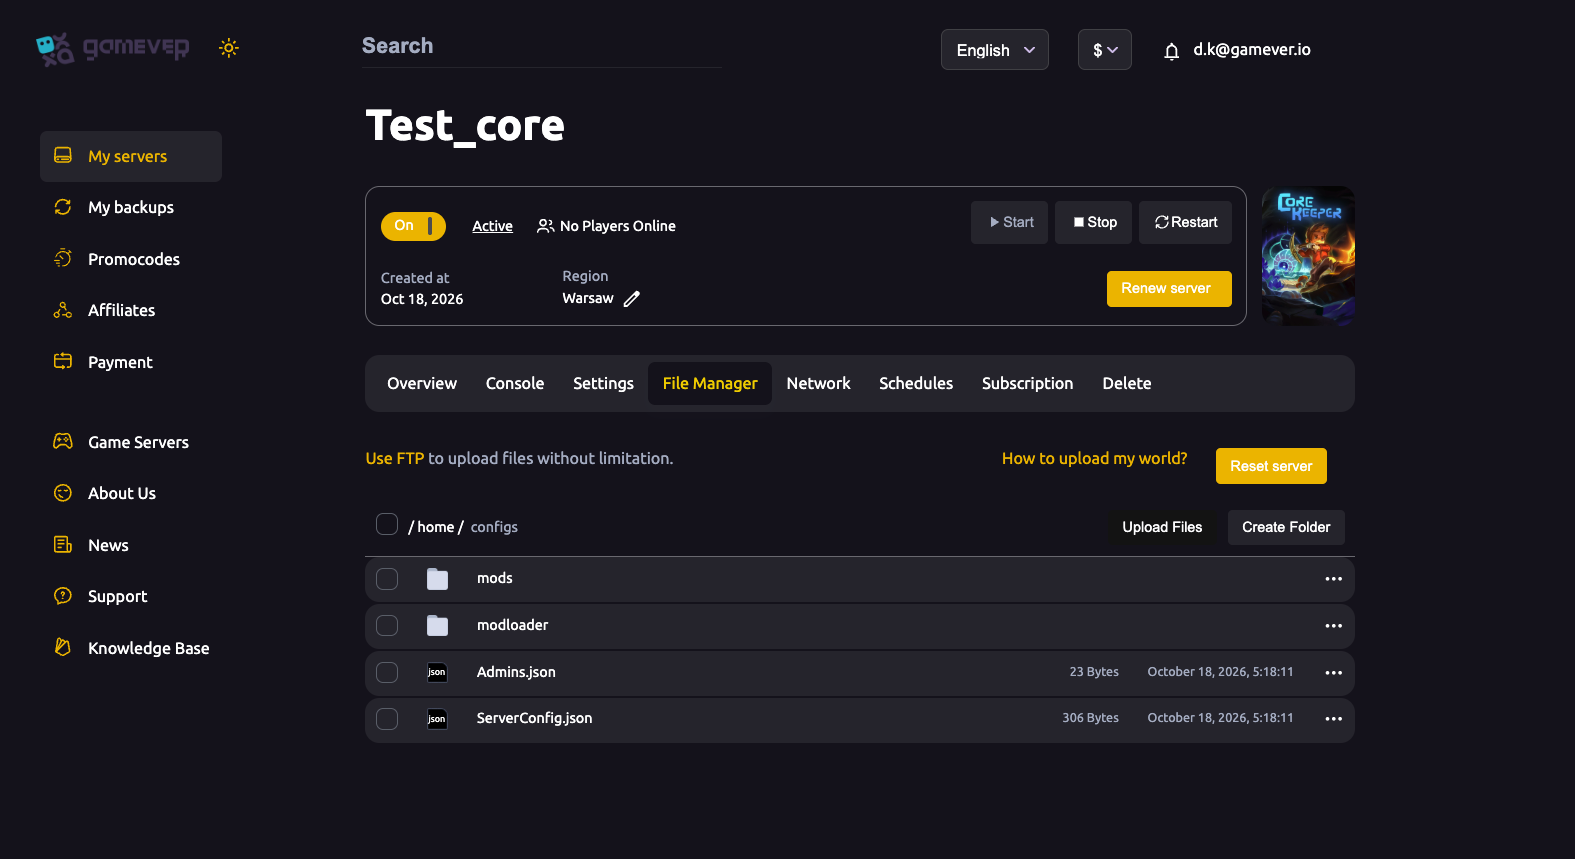
- Click Edit next to
Admins.json. - Add a new entry inside the
adminListarray with the player'ssteamId(SteamID64) andname, giving it a uniqueindex. Separate multiple entries with commas and double-check the braces. - Save the file.
- Back on the Overview tab, click Start.
Once the server restarts, the listed players have admin access when they join under the matching character name.
What admins can do, and how to kick or ban
Admins in Core Keeper manage the session from in-game rather than by typing console commands. Once a player has admin rights and is connected, they can open the pause menu (Esc) to reach the connected-players list and the Manage Players screen. From there an admin can:
- Promote other players to admin — the simplest way to add admins after the first one, with no file editing.
- Kick a player currently on the server.
- Ban a player: next to the player's name, click the red cancel icon and confirm in the dialog.
To unban, open the same Manage Players menu, switch to the Banned Players list, click the red icon next to the name, and confirm. Core Keeper persists bans by SteamID64, so a banned player can't rejoin simply by changing their character name.
Core Keeper's dedicated server does not expose a documented, typed /kick or /ban console command that we can confirm — community guides conflict on this, so we won't publish command syntax that might not match your build. The in-game Manage Players menu is the supported, reliable way to kick and ban. Use it rather than guessing at commands.
Controlling who can join at all
Beyond banning individuals, the cleanest way to keep a server private is to require a password. Core Keeper has no panel password field and no separate whitelist file; the join password lives in password inside ServerConfig.json — edit it the same way (Stop → File Manager → /home/configs/ServerConfig.json → Edit → Save → Start). See server settings for the rest of that file, and setting a password for the full walkthrough. With a password set, only players who have it can connect, which sidesteps most moderation before it starts.
Additional Tips
- Stop first, always.
Admins.jsonandServerConfig.jsonare only read at boot — edits made while the server runs are ignored or overwritten. - Use SteamID64, not usernames. The 17-digit numeric ID is what Core Keeper matches on; a vanity name or profile link won't work in the file.
- Validate your JSON. Paste the file into a JSON validator before saving if you're unsure — one broken comma can wipe out the whole admin list on restart.
- Promote in-game when you can. After the first admin exists, adding others from the Manage Players menu is faster and avoids file-editing mistakes.
- Back up before editing. Download a copy of
Admins.jsonvia the File Manager or FTP first, so a bad edit is a quick restore away. - Bans survive renames. Because bans key off SteamID64, you don't need to re-ban a returning player who simply changed their character name.
Conclusion
Admin control on a Core Keeper server comes down to one file: Admins.json in the File Manager at /home/configs/. Stop the server, add each admin by their SteamID64 and character name, save, and start — then let your admins kick, ban and promote others straight from the in-game Manage Players menu. For locking the server down to begin with, a password in ServerConfig.json does the heavy lifting.
Rent your Core Keeper server at gamever.io — full File Manager and FTP access so your admin list and configs are always yours to edit, with one-click restores if an edit goes sideways. Free trial, promo code WELCOME.