
Getting Started with Your Valheim Server on gamever
Welcome to your gamever Valheim server. Everything you need — server name, password, world, mods, backups and ports — is on the control panel, and your friends join directly by the server address (no Steam friends-only limits, no host needing to stay online). This guide is the quick tour and a first-time checklist, with links to deeper guides for each step.
The Overview tab
When you open your server you land on Overview:
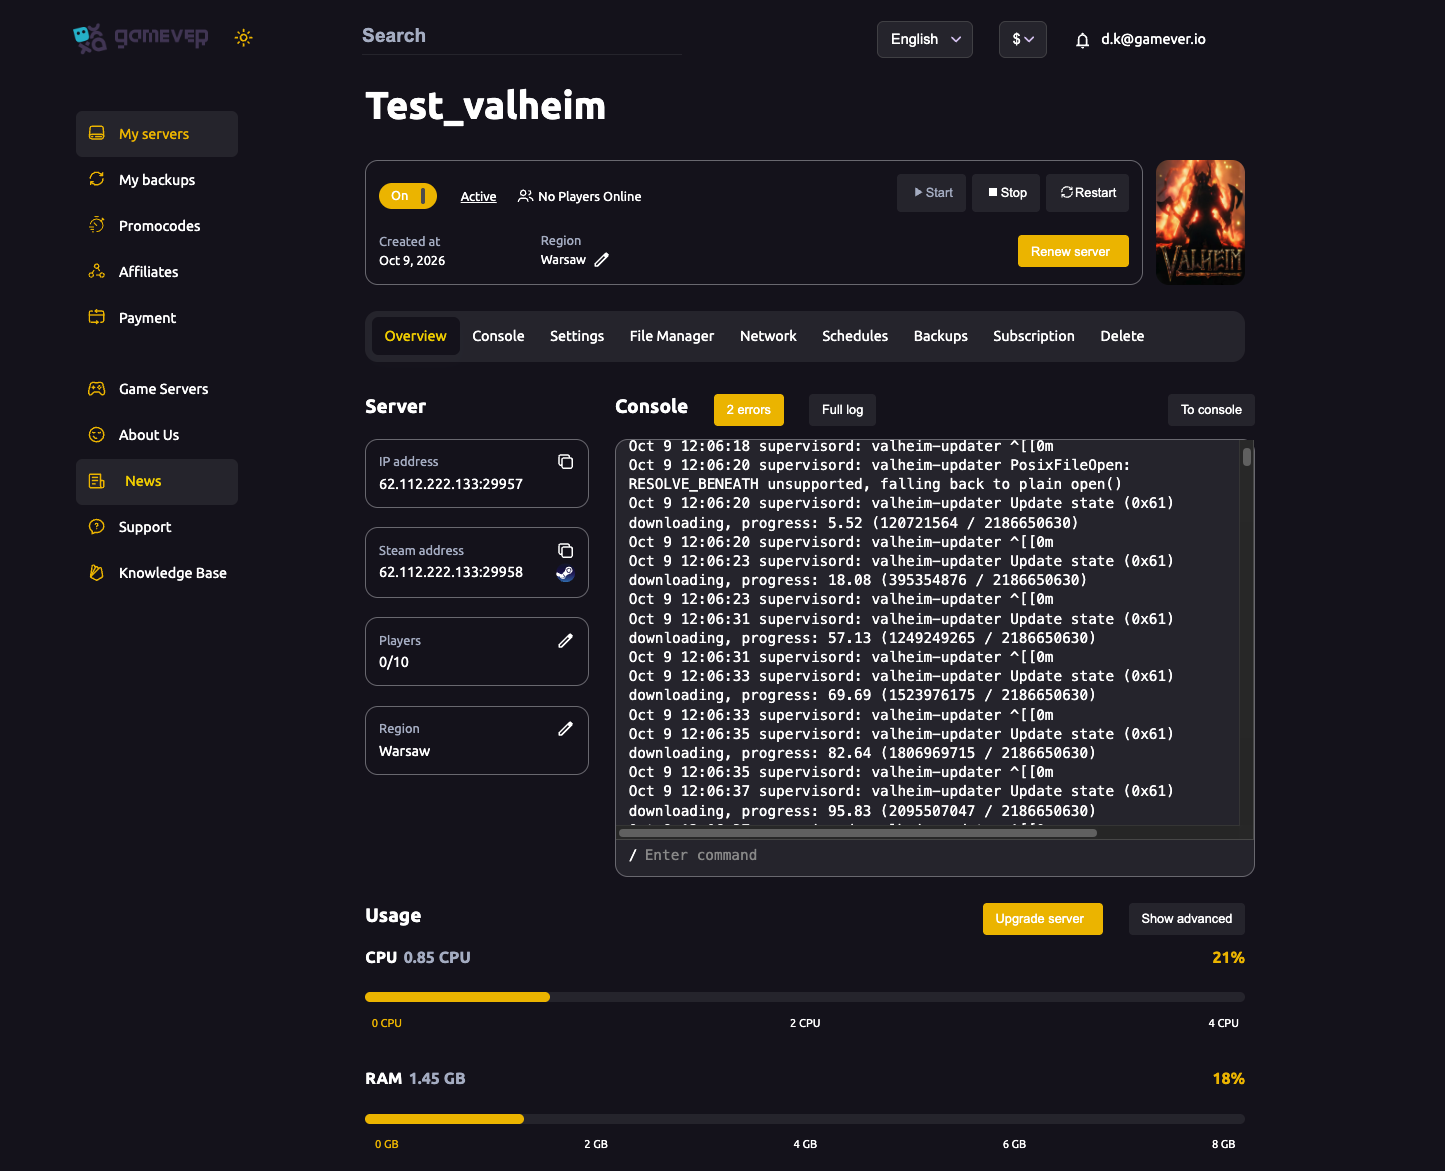
- On/Off, Start / Stop / Restart — power controls.
- IP address (
IP:29957) and Steam address (IP:29958) — copyable; the IP is what players use to join. - Players (e.g.
0/10) — your slot count, editable with the pencil (see max players). - Console — live log with an Enter command box.
- Usage — live CPU and RAM meters, with Upgrade server if you need more power.
The tab bar: Overview · Console · Settings · File Manager · Network · Schedules · Backups · Subscription · Delete.
What each tab is for
| Tab | Use it to |
|---|---|
| Settings | Server name, password, crossplay, world, beta branch, mods, restarts/backups, FTP. |
| File Manager | Edit configs and manage world/character files. |
| Network | Your server, Steam and FTP addresses — see changing the port. |
| Schedules / Backups | Automated restarts and your backup history. |
| Subscription / Delete | Billing and server removal. |
The Settings tab has sub-tabs: Players Settings · Server settings · Schedule & Backups · Mods · FTP server settings.
Your first-time checklist
- Wait for Active. On first boot the server downloads Valheim (you'll see progress in the Console). Give it a few minutes until Overview shows Active.
- Set your server name and password on Settings → Server settings — see server name & password.
- Pick your world (World name) and, if you want, a world preset/modifiers.
- Decide public or private listing — see public or private.
- Set up admins by Steam/Platform ID on Players Settings — see the three list files.
- Enable backups and a daily restart on Schedule & Backups — see backups and scheduled restarts.
- Join using the IP address from Overview/Network.
Good to know up front
- Players join by address — share your
IP:29957; no need for the host to be online. - Password is required and must be at least 5 characters (and can't be part of the server name).
- Vanilla caps at 10 players — going higher needs a mod (install mods).
- Admins are set by platform ID, not by name (admin vs devcommands).
- Back up before any big change — the Backups tab makes rollback easy.
Additional Tips
- Be patient on first boot — the Console download is normal; wait for Active.
- Copy the IP from Overview — that's what players need.
- Set a strong password — Valheim servers get scanned; 5+ chars, not in the name.
- Turn on backups immediately so you always have a restore point.
- Watch Usage with a full group and Upgrade server if CPU/RAM run hot.
Conclusion
Your gamever Valheim server is ready the moment it reaches Active: set a name and password, choose your world, add your admins, turn on backups and a daily restart, and share the IP. The panel handles everything a dedicated Valheim server needs — work through the checklist above and your Viking world is online 24/7 for the whole crew.
Rent your Valheim server at gamever.io — instant setup, crossplay, automatic backups and a browser console, all in one panel. Free trial, promo code WELCOME.