
Control Who Can See and Join Your 7 Days to Die Server
Who can find your 7 Days to Die server, and who can actually join it, are two separate decisions. One is handled by ServerVisibility — whether your server shows up in the in-game server browser at all. The other is the Server password — whether people who find it (or who have your IP) can get in. This guide explains both on your gamever-hosted server: the exact ServerVisibility values, how to make a server private, and how players reach it either through the browser or by direct IP.
Visibility vs. password — two different locks
It helps to keep these straight from the start:
| Control | What it decides | Where it lives |
|---|---|---|
| ServerVisibility | Whether your server is listed in the server browser | serverconfig.xml |
| Server password | Whether someone who finds the server (or has the IP) can join | Settings → Server settings |
Visibility only changes who sees the server in the list. A hidden server is still reachable by anyone who knows the address — hiding it is not the same as locking it. To actually restrict entry you set a Server password. For a truly private group you usually want both: hide the listing and set a password.
The ServerVisibility values
ServerVisibility takes one of three numbers. These are verified against the official 7 Days to Die serverconfig.xml reference:
| Value | Meaning |
|---|---|
| 2 | Public — the server is listed in the in-game server browser for everyone. This is the default. |
| 1 | Friends only — shown only to the Steam friends of connected players. Because you are never Steam "friends" with a dedicated server itself, this effectively only starts working once a first player has connected manually by IP. |
| 0 | Not listed — the server never appears in the browser. Players can only join by entering the address directly. |
Set the value to 2 for an open community server, 0 for a server you only want your invited group to reach by IP, and 1 for the narrower friends-of-players case.
A note on
ServerIsPublic. Older guides mention aServerIsPublictrue/false flag. Current 7 Days to Die builds use the three-state ServerVisibility setting instead, andServerIsPublicis not part of the currentserverconfig.xmlreference — so configure visibility with ServerVisibility, not the older name.
Setting the Server password (the real lock)
The password that controls who can join is a direct field in your gamever panel. Open Settings → Server settings:
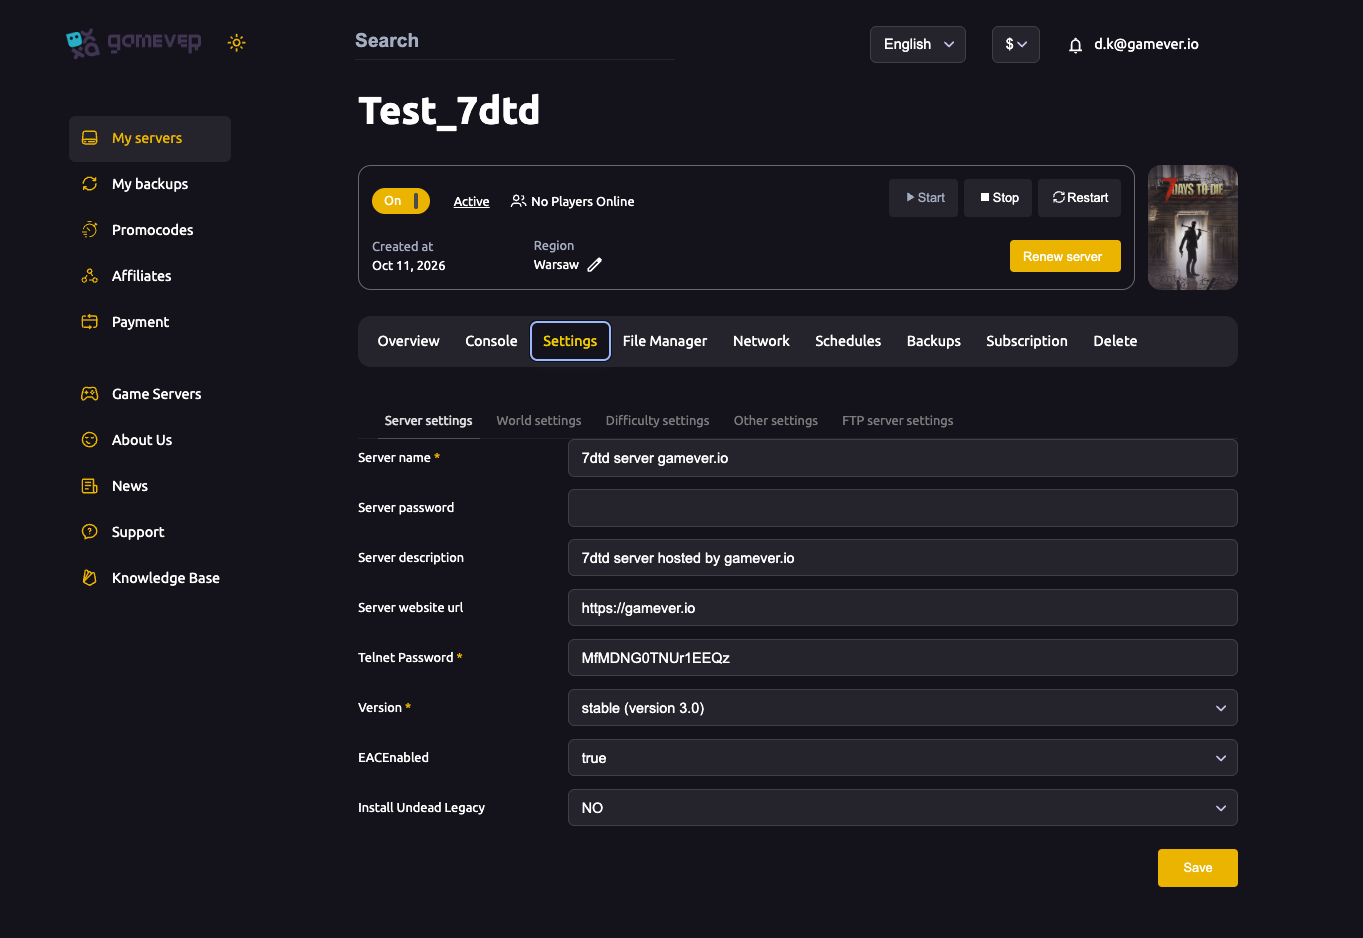
- Leave Server password blank → anyone who can reach the server can join (open server).
- Set a Server password → players must type it when connecting (private server).
Set it, click Save, then Restart from the Overview tab. Share the password only with your group, alongside the IP. For the full breakdown of the password fields — including the separate Telnet Password for remote admin — see passwords & admin.
Changing ServerVisibility on a gamever server
ServerVisibility is one of the values stored in your server's serverconfig.xml. The named Settings tabs cover identity, world, difficulty and so on (see server settings explained); to change visibility you edit the config directly in the panel:
- Stop the server from the Overview tab so your edit isn't overwritten on shutdown.
- Open the File Manager (or connect over FTP) and open
serverconfig.xml. - Find the
ServerVisibilityproperty and set itsvalueto2,1or0:
<property name="ServerVisibility" value="2" />
- Save the file, then Start the server again.
The change takes effect on the next start. There's no need to touch router or firewall settings — on a gamever server your game and query ports are already assigned and open.
How players actually find and join
Once your server is running, there are two ways in, and your visibility choice decides which ones work:
- Through the server browser. With
ServerVisibilityat2, your server is listed in-game under Join a Game. Players can search by your Server name and connect with one click (and enter the password if you set one). A freshly started public server can take a few minutes to register before it appears. - By direct IP. With any visibility value — and the only option at
0— players can use Connect to IP in the game and type your server address. Grab that address from the panel; it's the same IP:port you'd share for a private server. See getting started for the join-by-IP walkthrough.
So a hidden, password-protected server is perfectly playable: you simply hand your group the IP and the password instead of relying on the public list.
Additional Tips
- Hidden is not the same as locked.
ServerVisibility 0only removes the listing — set a Server password if you actually want to control who gets in. - Private group setup:
ServerVisibility 0plus a Server password, then share the IP and password with your players. - Stop before editing the config. Edit
serverconfig.xmlwhile the server is stopped so your change isn't overwritten, then start it again. - Give a public server a moment. After a restart it can take a few minutes to register before it shows in the browser.
- Use ServerVisibility, not ServerIsPublic — the old flag isn't part of the current config.
Conclusion
Controlling who sees and joins your 7 Days to Die server comes down to two settings: ServerVisibility (2 public, 1 friends-only, 0 not listed) decides who finds you in the browser, and the Server password decides who can actually join. Set the password on the Server settings tab, set visibility in serverconfig.xml through the panel's File Manager or FTP, and your group can always get in by IP regardless.
Rent your 7 Days to Die server at gamever.io — password controls, a File Manager and FTP for serverconfig.xml, and ports open out of the box. Free trial, promo code WELCOME.